
Blog
Protecting Your VPS from Hackers: Essential Suggestions

Aug
Wish to protect your VPS from hackers? You are not alone. Hacking is detrimental to any online presence, and organizations of all sizes are vulnerable to it in the event that they don’t implement the correct security measures.
In terms of your VPS, cyber threats can are available the shape of malware, brute-force attacks, broken authentication, and more. Unless you configure your VPS properly and implement effective and efficient security measures, you could be putting your online business susceptible to security breaches.
This text will cover what it is advisable to know concerning the risks of VPS hacking and supply a step-by-step guide to secure your VPS. It’ll also discuss the importance of selecting a reliable hosting provider and explore best practices for VPS management.
Introduction to VPS Hosting and Security
Virtual Private Server (VPS) hosting is a form of hosting that employs virtualization technology to create multiple virtual servers inside a single physical server. Each virtual server operates independently, allowing users to have dedicated resources and complete control over their hosting environment. This makes it more cost effective than dedicated hosting while offering more control and customization than shared hosting.
The VPS market is anticipated to grow by 14.53% over the following 5 years. Nevertheless, just like every other hosting solution, a VPS will not be proof against cyberattacks. In reality, as a consequence of the character of shared resources, it may be vulnerable to cyber threats if not properly secured.
Why Configuring Your VPS Matters
Simply acquiring a VPS is not enough to ensure a secure and stable hosting environment. Proper configuration plays a pivotal role in ensuring the integrity and performance of your online presence, safeguarding it from any malicious dangers.
Listed below are a number of the advantages which you could harness by fine-tuning your Linux web server settings:
- Enhanced security – Implementing robust security measures similar to firewalls, intrusion detection systems, and secure access protocols fortifies your hosting environment against unauthorized access and potential breaches.
- Optimal performance – Effective-tuning various parameters like resource allocation, network settings, and caching mechanisms ensures the seamless operation of your server.
- Scalability – Configuring your VPS allows for efficient scaling by allocating resources dynamically and handling traffic spikes effectively, ensuring your hosting environment can accommodate growing demands.
- Control and suppleness – Customizing software packages, frameworks, and libraries tailored to your needs provides greater control over your hosting environment, together with the flexibility to put in monitoring and logging tools for proactive troubleshooting and maintenance.
That being said, it is advisable to take proactive steps to secure your virtual hosting environment.
A Step-By-Step Guide to Secure Your VPS
Securing your VPS goes beyond the initial setup and requires careful consideration of security measures. With that in mind, we have fastidiously put together this step-by-step guide to provide help to secure your environment effectively and fortify your server, minimizing the danger of unauthorized access or data breaches.
Step 1: Access Your VPS Via SSH and Enable Public Key Authentication
Secure Shell (SSH) is a strong cryptographic network protocol that may assist you to securely connect with a distant machine or server over an unsecured network, just like the web, and perform various operations, including distant command execution, file transfers, and even tunneling other protocols.
Before granting access to a distant system, SSH verifies the identity of the user or client connecting to it using public-key cryptography, where the client presents a public key, and the server verifies it against a stored private key. This public key authentication process adds an additional layer of security, ensuring that only authorized users can access the distant resources.
Here’s what it is advisable to do to access your server using SSH with public key authentication:
For Windows Users
1. Be certain that you’ve got Git installed, then open the Command Prompt or PowerShell.
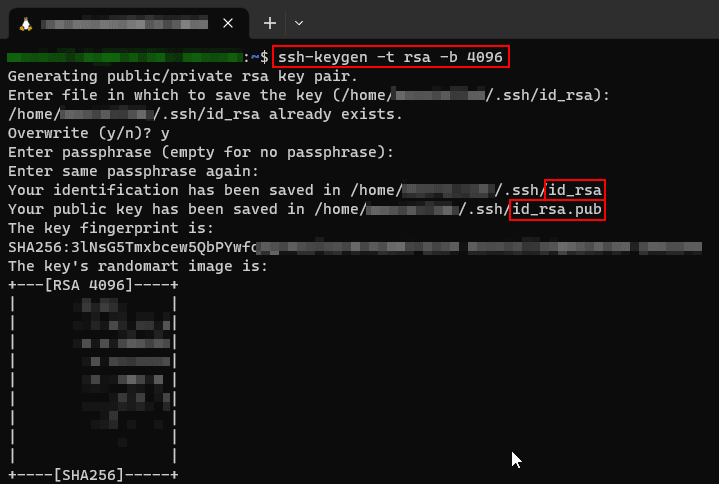
2. Type the next command to generate a brand new SSH key pair:
ssh-keygen -t rsa -b 4096You possibly can select a distinct type and bit size if desired.
3. Press Enter and supply a location to save lots of the important thing pair when prompted. It’s also possible to leave it blank to make use of the default location.
4. Enter a passphrase. It’s endorsed to make use of a powerful passphrase for added security. Note that the characters won’t be visible as you type.
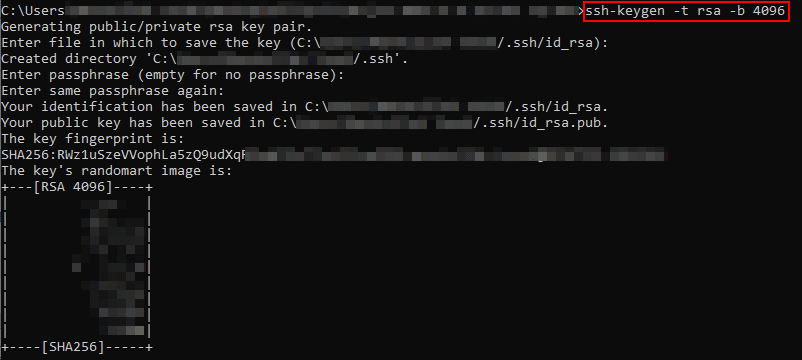
Then, the SSH key pair might be generated and saved to the desired location. The general public key can have a .pub extension.

5. Be certain that you’ve got the IP address of your VPS, which is often provided by your hosting provider, then type the next command, replacing username together with your VPS username and your_vps_ip with the IP address of your VPS:
Alternatively, if you should connect with your VPS using an application as a substitute of the Command Prompt, you may follow these instructions after generating your SSH key authentication using the above steps:
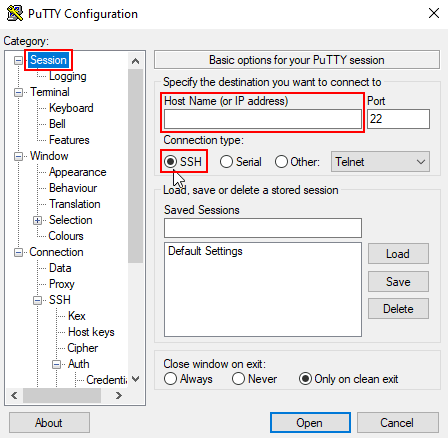
1. Download and install PuTTY
2. Launch PuTTY, go to the Session category, enter your VPS IP address within the Host Name (or IP address) field, and choose the SSH option within the Connection type field.
3. Go to the Connection category, expand the SSH menu, and choose Auth. Within the Private key file for authentication field, click the Browse button to locate and cargo your SSH private key file, then click Open to initiate the SSH connection.
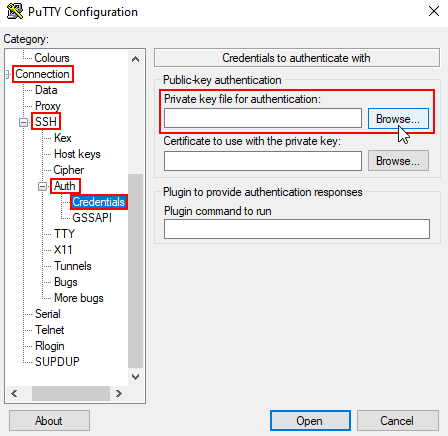
You’ll now be connected to your server.
For Linux or macOS Users
1. Open the terminal application. You don’t need to put in SSH because it’s available.
2. Execute the next command to generate a brand new SSH key pair:
ssh-keygen -t rsa -b 4096Change the bit size to your needs.
3. Press Enter and supply a location to save lots of the important thing pair when prompted. You possibly can leave it blank to make use of the default location.
4. You will be asked to enter a passphrase. Just like Windows, it is strongly recommended to make use of a powerful passphrase for enhanced security.
5. Be certain that you’ve got the IP address of your VPS, which is often provided by your hosting provider, then type the next command, replacing username together with your VPS username and your_vps_ip with the IP address of your VPS:
You may must specify your private key using the -i flag:
ssh -i /path/to/private_key username@your_vps_ipYou’ll now be successfully connected to your server.
Step 2: Update Your Server and Software
Once you’ve got connected successfully to your VPS, it’s essential to update your package manager to make sure access to the most recent software packages and security updates. Depending on the Linux distribution you might be using, the commands may differ barely.
It’s endorsed to migrate to a VPS server running a current Linux OS distro that will not be going end-of-life (EOL), similar to AlmaLinux 8, Rocky Linux 8, or Ubuntu 22.04 LTS, to be certain that you continue to get security patches and bug fixes.
For Ubuntu (Debian-based) Systems
1. Run the next commands to fetch the most recent package lists and upgrade any outdated packages in your system:
sudo apt update
sudo apt upgrade
2. Install any required software packages on your specific needs. Use this command, replacing package_name with the name of the software you should install:
sudo apt install package_name3. Upgrade your complete distribution to a more moderen release by running the next command:
4. After completing the updates, reboot your server.
5. Confirm the updates by logging back into your server and running this command:
sudo apt list --upgradableFor CentOS (RHEL-based) Systems
We’ll do the identical for CentOS, but by executing barely different commands:
1. Fetch the most recent package lists using this command and upgrade any outdated packages in your system:
sudo yum updatesudo yum upgrade2. Install any required software packages on your specific needs. Use this command, replacing package_name with the name of the software you should install:
sudo yum install package_name3. For versions after CentOS 8 to CentOS Stream:
sudo yum install centos-release-stream
sudo yum distro-sync
4. After completing the updates, reboot your server.
5. Confirm the updates by logging back into your server and running this command:
You may also want to think about upgrading your server, depending on the traffic you experience and your specific goals.
Step 3: Create and Manage User Accounts
Considered one of the important thing tasks that it is best to do to maintain your VPS secure is creating and managing user accounts. User accounts will enable you to permit the individuals that you should access your server to perform specific tasks without allowing them to take full control of your server. This may keep your VPS structured, organized, and protected from security risks.
You possibly can assign user roles from a wide range of user account types, each serving different duties and purposes.
| User Account Type | Description | Roles and Permissions |
|---|---|---|
| Root (Superuser/Administrator) | The foundation user has unrestricted access to your complete system. | Performs administrative tasks, system configuration, software installation, and user management. |
| Regular | Assigned to individuals needing access to the server for specific tasks or services. | Has limited permissions, can only access specific files and directories, and may’t perform administrative tasks. |
| Group | Assigned to a gaggle of users with shared access and permissions. | Allows collaboration and shared access to files, directories, or resources. Specific permissions get assigned to the group as an entire. |
| Guest | Provide temporary access to users without regular accounts. | Restricts privileges to only allow the execution of basic tasks, limits access to system resources, and typically expires or gets deleted after a selected period or session. |
| Service | Created for applications, services, or daemons running on the server. | Permits apps to execute specific processes or services, often without interactive login capabilities, and limits access to system resources. |
| System | Created throughout the installation of specific software or services. | Allows specific apps to administer and execute system processes dedicated to specific system-related tasks. |
Now that we’ve explored all the several user roles we will have on our server, let’s see easy methods to assign them:
1. Hook up with your server either physically or remotely using SSH. Be certain that you’re logging in from the basis user account or using the sudo command to be certain that you’ve got administrative privileges. This can be a must to create users in your server.
ssh username@server_ip_addressReplace username together with your username and server_ip_address with the IP address or hostname of your server, which ought to be provided to you by your hosting provider.
If you happen to’re using a distinct port than the default port (22), you may specify the port number using the -p flag.
sudo ssh -p port_number username@server_ip_addressReplace port_number with the actual port number you employ on your server.
2. Select an appropriate username for the brand new user, following naming conventions like lowercase letters, numbers, and underscores. Run the next command if you should create a regular user:
If you should create a brand new user and assign it a guest user, you should utilize this command:
sudo useradd -e YYYY-MM-DD usernameReplace username with the actual username that you should create, and alter YYYY-MM-DD to the date you would like the user account to run out. The date should be specified using the YYYY-MM-DD format.
If you should create a brand new user and assign it to a selected user group, use the next command:
sudo usermod -a -G groupname usernameReplace username with the actual username that you should create, and replace groupname with the name of the group that you should assign the brand new user to.
The -a flag ensures that the user is added to the group without removing them from some other groups they could already be an element of.
For instance, to grant the brand new user sudo privileges, add them to the sudo group (Ubuntu) or the wheel group (CentOS):
sudo usermod -a -G sudo username      # Ubuntu
sudo usermod -a -G wheel username     # CentOS
3. In case your system doesn’t prompt you to enter a password, you should utilize the next command:
Be certain that to decide on a secure password for the user account and include a mix of uppercase and lowercase letters, numbers, and special characters. If you’re entering the password, the characters won’t be visible as you type them.
After that, you might be asked to supply some additional information concerning the user, similar to their full name, phone number, etc. You possibly can either provide this information or press Enter to skip these fields.
Step 4: Manage Permissions
One other great option to up the safety of your VPS is to administer and alter the ownership of your files or directories to be certain that only the required access is provided. Essentially, permissions determine who has access to read, write, and execute files and directories in your server.
Here is the command you’ll need to vary the ownership of a selected file or directory to a username and group:
sudo chown username:groupname /path/to/file_or_directoryThe chown command stands for “change owner”. Replace username, groupname, and /path/to/file_or_directory with the actual values.
If you should change the permissions of a file or directory, you’ve got to make use of this command:
sudo chmod permissions /path/to/file_or_directoryReplace permissions with the actual permissions you should assign. These are the three different permissions:
| Permission | Symbol | Number Value | Function |
|---|---|---|---|
| Read | r | 4 | Permits you to only view the contents of a file or directory without with the ability to edit anything. |
| Write | w | 2 | Permits you to add, delete, or edit the contents of a file or directory. |
| Execute | x | 1 | Permits you to execute a file or enter a directory by running scripts. |
As an example, if you should assign Read, Write, and Execute permissions for the Owner user, Read and Execute permissions to Group users, and only Read permissions for Guest (Other) users, your command will appear to be this:
sudo chmod 754 /path/to/file_or_directoryAlternatively, you possibly can run it as such:
sudo chmod rwxr-xr-- /path/to/file_or_directoryThat is how we got here up with the number 754 or rwxr-xr–, the – replacing the 0 values.

You need to adhere to the Principle of Least Privilege (PoLP), which is rooted within the concept of minimizing risk. It advocates for a minimalist approach with regards to granting privileges to users or software components on a server.
Quite than providing unrestricted access, this principle emphasizes the importance of granting the minimum set of privileges required for a person or process to perform their designated functions effectively.
This may help significantly enhance your server security and mitigate the potential risks that stem from granting excessive privileges, similar to accidental or intentional misuse, system compromise, or the exploitation of vulnerabilities.
Step 5: Set Up a Firewall for Enhanced Security
A firewall is basically a network security measure that monitors and controls incoming and outgoing traffic based on predetermined security rules. It acts as a barrier and the primary line of defense, examining data packets and determining whether to permit or block their transmission.
Here is how you may arrange a firewall in your server using two different methods: UFW and FirewallD.
Using UFW for Ubuntu (Debian-based) Systems
Uncomplicated Firewall (UFW) is a user-friendly command-line tool that simplifies firewall management on Linux systems. It provides an uncomplicated interface to create and manage firewall rules effortlessly.
To put in UFW, enter the next command:
sudo apt update
sudo apt install ufw
By default, UFW denies all incoming connections and allows all outgoing connections. You possibly can check the present settings by running this command:
If you happen to find that your permissions are set to the default, and you should try this, run the next commands:
sudo ufw default deny incoming
sudo ufw default allow outgoing
Since SSH is often the first technique of accessing a distant Linux server, it’s crucial to enable SSH connections explicitly:
sudo ufw allow ssh #Allow SSH connections (default port 22)Consider the services your VPS requires, similar to hosting or database management, then allow access to those services through specific ports using this command:
sudo ufw allow / Replace
sudo ufw allow 80/tcp                  #Allow HTTP traffic (port 80)
sudo ufw allow 443/tcp                 #Allow HTTPS traffic (port 443)
sudo ufw allow 123/udp                 #Allow NTP traffic (port 123, UDP)
Once you’ve got defined the mandatory rules, enable UFW by typing:
Your latest firewall permissions will mechanically be enabled when you reboot your server.
Using FirewallD for CentOS (RHEL-based) Systems
Firewall Daemon (FirewallD) is a dynamic firewall management tool designed specifically for Linux operating systems. It provides a user-friendly interface to administer network traffic and offers a convenient option to configure and administer firewall rules.
Install FirewallD using the next command:
sudo yum install firewalldFirewallD operates with the concept of zones, which define the extent of trust assigned to a network connection. By default, FirewallD provides a set of predefined zones, similar to public, trusted, home, work, and internal. Each zone has a selected algorithm that govern the traffic flow.
Before making any modifications, confirm the default zone assigned to your VPS. The default zone dictates the principles applied to network connections that don’t match any specific zone.
sudo firewall-cmd --get-default-zoneIf the default zone will not be set to your required level of security, you may change it using the next command:
firewall-cmd --set-default-zone=Replace
As a rule of thumb, set the default zone to dam all incoming traffic and permit all outgoing traffic using this command:
sudo firewall-cmd --set-default-zone=dropFirewallD offers an array of options for managing zones, including adding or removing services, ports, and IP addresses. For instance, to establish basic rules to permit incoming SSH connections and deny all other incoming traffic, use the next command:
sudo firewall-cmd --zone=public --add-service=ssh --permanent
sudo firewall-cmd --reload
You possibly can do the identical for other specific incoming traffic:
#Allow HTTP traffic (port 80)sudo firewall-cmd --zone=drop --add-port=80/tcp --permanentsudo firewall-cmd --reload
#Allow HTTPS traffic (port 443)
sudo firewall-cmd --zone=drop --add-port=443/tcp --permanentsudo firewall-cmd --reload
#Allow NTP traffic (port 123, UDP)
sudo firewall-cmd --zone=drop --add-port=123/udp --permanentsudo firewall-cmd --reload
Once you’ve got configured your zones and rules, activate FirewallD to enable it in your VPS by running the next:
sudo systemctl enable --now firewalldOrganising a firewall will not be a one-and-done task. Be certain that to all the time consider your specific needs fastidiously to have the option to configure your firewall effectively and efficiently. Often reviewing and updating firewall rules is important to take care of a secure environment.
Alongside this, monitoring firewall logs provides invaluable insights into firewall activities and helps discover potential security breaches. By default, firewall logs are stored within the system log files.
For Ubuntu systems, you’ll find them within the /var/log/ufw.log file, while CentOS systems store them within the /* file.
The importance of monitoring these logs can’t be overstated. Each connection attempt is recorded within the log files, allowing you to discover any suspicious activity, similar to Distributed Denial-of-Service (DDoS) attacks, SQL injections, or malicious code.
As an example, a high volume of connection attempts from a single IP address may indicate a brute-force attack or an attempt to take advantage of system vulnerabilities. By promptly investigating such activities, you may take appropriate measures to mitigate the risks and fortify your defenses.
Managed vs Self-Managed VPS Hosting
When selecting a VPS hosting solution, you will need to make a decision between managed and self-managed options. With managed VPS hosting, similar to Liquid Web’s managed VPS hosting, the provider takes care of server maintenance, security updates, and other administrative tasks. This may be a wonderful option for individuals who lack the technical expertise or time to administer their VPS.
Then again, self-managed VPS hosting gives you full control over your server, allowing you to configure it to your exact needs. Nevertheless, this feature requires more technical knowledge and may be time-consuming.
Ultimately, the alternative between managed and self-managed VPS hosting will rely on your specific needs and resources.
Best Practices and Optimization Suggestions for VPS Management
Effectively managing your VPS is crucial for maintaining security, performance, and reliability. Listed below are some best practices and suggestions for optimizing VPS management.
- Regular backups – Schedule regular backups of your VPS to make sure data recovery in case of hardware failure, data corruption, or security breaches. Store your backups offsite or with a reliable cloud storage provider for added protection.
- Monitoring server performance – Actively monitor your server’s performance, including CPU usage, memory usage, disk space, and network traffic. This may provide help to discover potential issues and optimize your server for higher performance.
- Maintaining strong password policies – Implement strong password policies for all user accounts in your VPS, including using complex and unique passwords, changing passwords recurrently, and avoiding the usage of default or easily guessable passwords.
- Implementing multi-factor authentication (MFA) – Enable MFA for accessing your VPS so as to add an additional layer of security, making it harder for unauthorized users to realize access to your server.
- Keeping software up-to-date – Often update your server’s operating system, applications, and installed packages to make sure security and stability. Apply security patches promptly to handle vulnerabilities and protect your VPS from potential threats.
- Configuring a firewall – Arrange a sturdy firewall to guard your VPS from external threats and unauthorized access. Often review and update your firewall rules to take care of security.
- Staying informed about emerging security threats and vulnerabilities – Not sleep-to-date with the most recent security news, threats, and vulnerabilities that will affect your VPS. Often update your security measures to handle these risks and protect your server.
- Implementing the principle of least privilege – Grant users the minimum permissions mandatory to perform their tasks, reducing the danger of unauthorized access or actions. Often review user accounts and permissions to make sure they’re appropriate and secure.
- Encrypting sensitive data – Use encryption to guard sensitive data stored in your VPS, similar to customer information, passwords, and API keys. This may help prevent unauthorized access to your data in case of a security breach.
- Auditing and logging – Implement auditing and logging mechanisms to trace user activities, server events, and security incidents. Often review your logs to discover potential issues and maintain security.
Select Liquid Web for a Secure and Reliable VPS Hosting Solution

In terms of choosing a VPS hosting provider, security and reliability ought to be top priorities. Liquid Web stands out as a perfect alternative for businesses and individuals searching for a secure hosting environment, offering a variety of features and advantages that set the corporate other than the competition, including:
- Fully managed hosting – Liquid Web’s fully managed hosting takes the effort out of managing your hosting infrastructure by providing proactive management, network security, and availability. This is very useful for small and medium-sized businesses, in addition to developers and IT professionals who may not have the time or resources to administer their hosting environment.
- High availability and 99.999% uptime – Reliable hosting ensures that your website or application is all the time up and running, minimizing downtime and providing a seamless experience on your users. That is crucial for eCommerce businesses, media and content providers, and enterprise-level businesses that rely on consistent performance.
- Customizable infrastructure – Liquid Web offers tailored solutions to suit the unique needs of your project, including designing custom, multi-server platforms, which helps enterprise-level businesses and people with complex hosting requirements to attain their goals faster.
- Compliant solutions – Liquid Web’s secure and compliant hosting environment satisfies HIPAA or PCI requirements, ensuring that sensitive information might be protected. This is especially necessary for eCommerce businesses and healthcare providers who handle sensitive data.
- Helpful human support – Liquid Web offers exceptional customer support, available 24/7/365, which ensures that you just all the time have a knowledgeable team at your disposal, able to help with any issues or questions that will arise.
- Transparent pricing and complimentary migrations – Liquid Web provides no-contract, transparent pricing, making it easy for brand new customers to change to their hosting services. Additionally they provide complimentary migrations for many hosting control panels, ensuring a smooth transition on your site, store, or application.
- Superb customer reviews – A plethora of reviews highlight customers’ satisfaction and the credibility of Liquid Web’s hosting services.
Liquid Web has provided exceptional service and support for our growing eCommerce business. Their fully managed VPS hosting has allowed us to give attention to our core operations while knowing that our website is in good hands.“
– John D., eCommerce business owner
Secure Your VPS for a Secure and Stable Hosting Experience
By following best practices and optimization suggestions, you may effectively manage your VPS and protect it from potential threats and vulnerabilities.
That’s why Liquid Web offers a secure and reliable VPS hosting solution, making it a perfect alternative for businesses and individuals searching for a secure hosting environment.
Don’t compromise on security and reliability when selecting a VPS hosting provider.