
Blog
The right way to Fix WordPress 403 Forbidden Error

Oct
Trespassing is illegitimate. But, in the event you’re encountering the 403 Forbidden error, you’re probably not attempting to break into some kind of a top-secret black site.
The 403 Forbidden error typically occurs whenever you’re attempting to log in to WordPress or visit a particular page, but can’t. This could be incredibly frustrating.
Fortunately, there are a number of easy fixes for this common WordPress error. Depending in your hosting plan, it’s possible you’ll even have the ability to resolve the problem with help out of your web host.
On this post, we’ll take a better have a look at the 403 Forbidden error and its most important causes. We’ll then show you 11 ways to repair it.
Get Content Delivered Straight to Your Inbox
Subscribe to our blog and receive great content identical to this delivered straight to your inbox.
What Is The 403 Forbidden Error?
The 403 Forbidden error signifies that your server thinks you would not have the required permission to access that exact page. This is normally attributable to a difficulty with file permissions, but might be attributable to one other problem related to hosting or authentication.
The 403 Forbidden error typically appears whenever you’re attempting to log in to your WordPress admin area or when visiting a particular page in your site. It’s possible you’ll also encounter it while installing WordPress.
It’s one in every of several HTTP status codes utilized by servers to speak along with your browser.
The error is normally accompanied by one in every of the next messages (or similar variations):
- “HTTP 403 Forbidden – Access to this resource on the server is denied.”
- “HTTP Error 403 – Forbidden.”
- “Forbidden – You don’t have permission to access [directory name] on this server.”
- “You aren’t authorized to view this page.”
- “It appears you don’t have permission to access this page.”
- “403. That’s an error. Your client doesn’t have permission to get URL [address] from this server.”
As a substitute of the “403 Forbidden” status, you would possibly come across a straightforward notification that claims “Access Denied.” Additionally it is possible that you’ll get the next message: “Access to [domain name] was denied. You don’t have authorization to view this page.”
What Causes The 403 Forbidden Error?
There are several possible causes of the 403 Forbidden error code however the most certainly one is an incorrect file permission in your server.
Which means a number of files the browser is attempting to access aren’t accessible due to their permissions.
Permissions directives determine who can view and modify the files in your website and your web server. They protect your files from outside tampering. But, in some cases, if misconfigured, they’ll prevent your site from working accurately.
Nevertheless, this error will also be triggered by a faulty plugin or a corrupt .htaccess file.
Generally, you need to have the ability to resolve the problem on your individual. Nevertheless, you may additionally must get in contact along with your hosting provider to access or change some settings in your site.
11 Ways To Fix The 403 Forbidden Error In WordPress
Now, let’s undergo a number of ways you possibly can fix the 403 Forbidden error.
First, we recommend that you just make a backup of your site just in case something goes incorrect and it’s worthwhile to restore it to an earlier version.
We’ll explore some common causes and how one can fix the issue:
- Check the URL
- Perform a Hard) Refresh
- Clear Browser Cache
- Disconnect from VPN
- Check Index Page
- Change Your File Permissions
- Deactivate Your Plugins
- Delete and Restore the .htaccess File
- Deactivate Your CDN
- Check Hotlink Protection
- Contact Your Web Host
1. Check The URL And (Hard) Refresh
Before we delve deeper, let’s make an assumption – you’re operating on a non-public Wi-Fi network. It’s essential to notice that public networks often have different firewall rules which will prevent you from accessing your website.
With our Wi-Fi network disclaimers out of the best way, let’s really begin.
First, double-check the URL that you just’re typing into your web browser and be certain that it’s pointing to the proper website and web page.
Sometimes, a small mistype in the online address can trigger an error, or a broken link in your website could have sent you to a page that doesn’t exist, triggering the 403 error.
If the URL looks correct and there aren’t any problems with its structure, format, or spelling, then we’ll move onto refreshing the page.
2. Perform A (Hard) Refresh
Next, try refreshing the page.
In most browsers like Google Chrome, you possibly can do that by simply clicking on the address bar to spotlight the address. Then press “Enter.”
If refreshing doesn’t help, then let’s try a “Hard” refresh.
This is a straightforward trick that clears your browser’s cache for the precise page you’re attempting to access. This forces the browser to download the most recent version of the page and might fix the problem.
To perform a tough refresh in Google Chrome: Open the page and press Cmd + Shift + R.
The page should refresh and you possibly can see if this solved the issue.
If not, then let’s take it to the subsequent step.
3. Clear Browser Cache
Website errors are either attributable to server-side problems (issues with the web site, server, or configuration) or client-side problems (issues with the browser or user’s device, settings, etc).
Your browser cache is one client-side problem that could cause many unexpected issues.
Luckily it’s easy to repair. You simply clear the cache to force your browser to completely fetch content from the pages you’re attempting to visit.
Follow these instructions to clear your browser’s cache.
Nerd note: If this doesn’t work and also you really need to make sure it’s not a caching issue, you possibly can try flushing your DNS cache, too. Simply to be protected.
4. Disconnect From VPN
VPNs (Virtual Private Networks) are great for masking your location and protecting your privacy online. Because they route your web activity through somewhere aside from your actual location, additionally they change your IP address.
This is sweet for privacy, but it will possibly create access and permissions issues on certain web sites.
In case you’re using a VPN, try disabling it after which repeating the above steps.
5. Check Index Page
Now we’re going to dig in a bit further and begin diagnosing potential problems along with your website files, permissions settings, and other problems which will give rise to the 403 error.
Most web sites, including WordPress sites, expect your homepage to have a particular file name by default.
Unless otherwise specified, the location will search for a file named something like:
If the page is missing, you’ll likely have issues.
Before we start adjusting file permissions, let’s just be certain that your homepage file is undamaged and accurately named.
To do that, you’ll must take one to 2 steps:
- Connect with your site with a Secure File Transfer Protocol (S/FTP) client, equivalent to FileZilla
- Access your site through the file manager in your hosting account
If you’ve gotten a DreamHost account, this guide from our knowledge base will walk you thru accessing and utilizing the built-in file manager.
Whether you access your files through S/FTP or a file manager, it’s worthwhile to look on your “index” file.
Inside your root directory, you’ll likely discover a folder called something like “myexamplesite.com” (In case you’re a DreamPress user, the folder might be called “{YOURSITE}.dream.press”.)
That is the most important folder that accommodates all your website’s files.
Open it and search for a file called either “index.html” or “index.php”.
In case you’re using WordPress, then it’s possible you’ll must take a number of extra steps. Navigate to wp-content > themes > {YOUR THEME}. The index file on your specific site theme should live on this folder.
In case you find an index.php or index.html file, then that is unlikely to be causing your 403 error.
In case you can’t find an index file, then this might be the problem that’s generating the 403 error.
Start by creating and uploading a blank “index.html” or “index.php” file into the relevant folder.
Then go try your website again, performing a tough refresh.
You almost certainly won’t see your website, but in the event you see a blank screen somewhat than the 403 error, then it’s likely that you just’ve found the issue.
At this point, you’ll probably need to try contacting your web host for help. Alternatively, roll back your website to a previous backup version before the issue occurred.
In case you’re using WordPress, you possibly can consider installing WordPress again. (This may wipe out your settings, themes, and plugins, but it surely shouldn’t impact the content and files you’ve added to your database.)
6. Change Your File Permissions
Every WordPress file in your site’s server has its own access permissions. These settings control who can access and modify its contents. If these files have incorrect permissions, your server will stop you from accessing them.
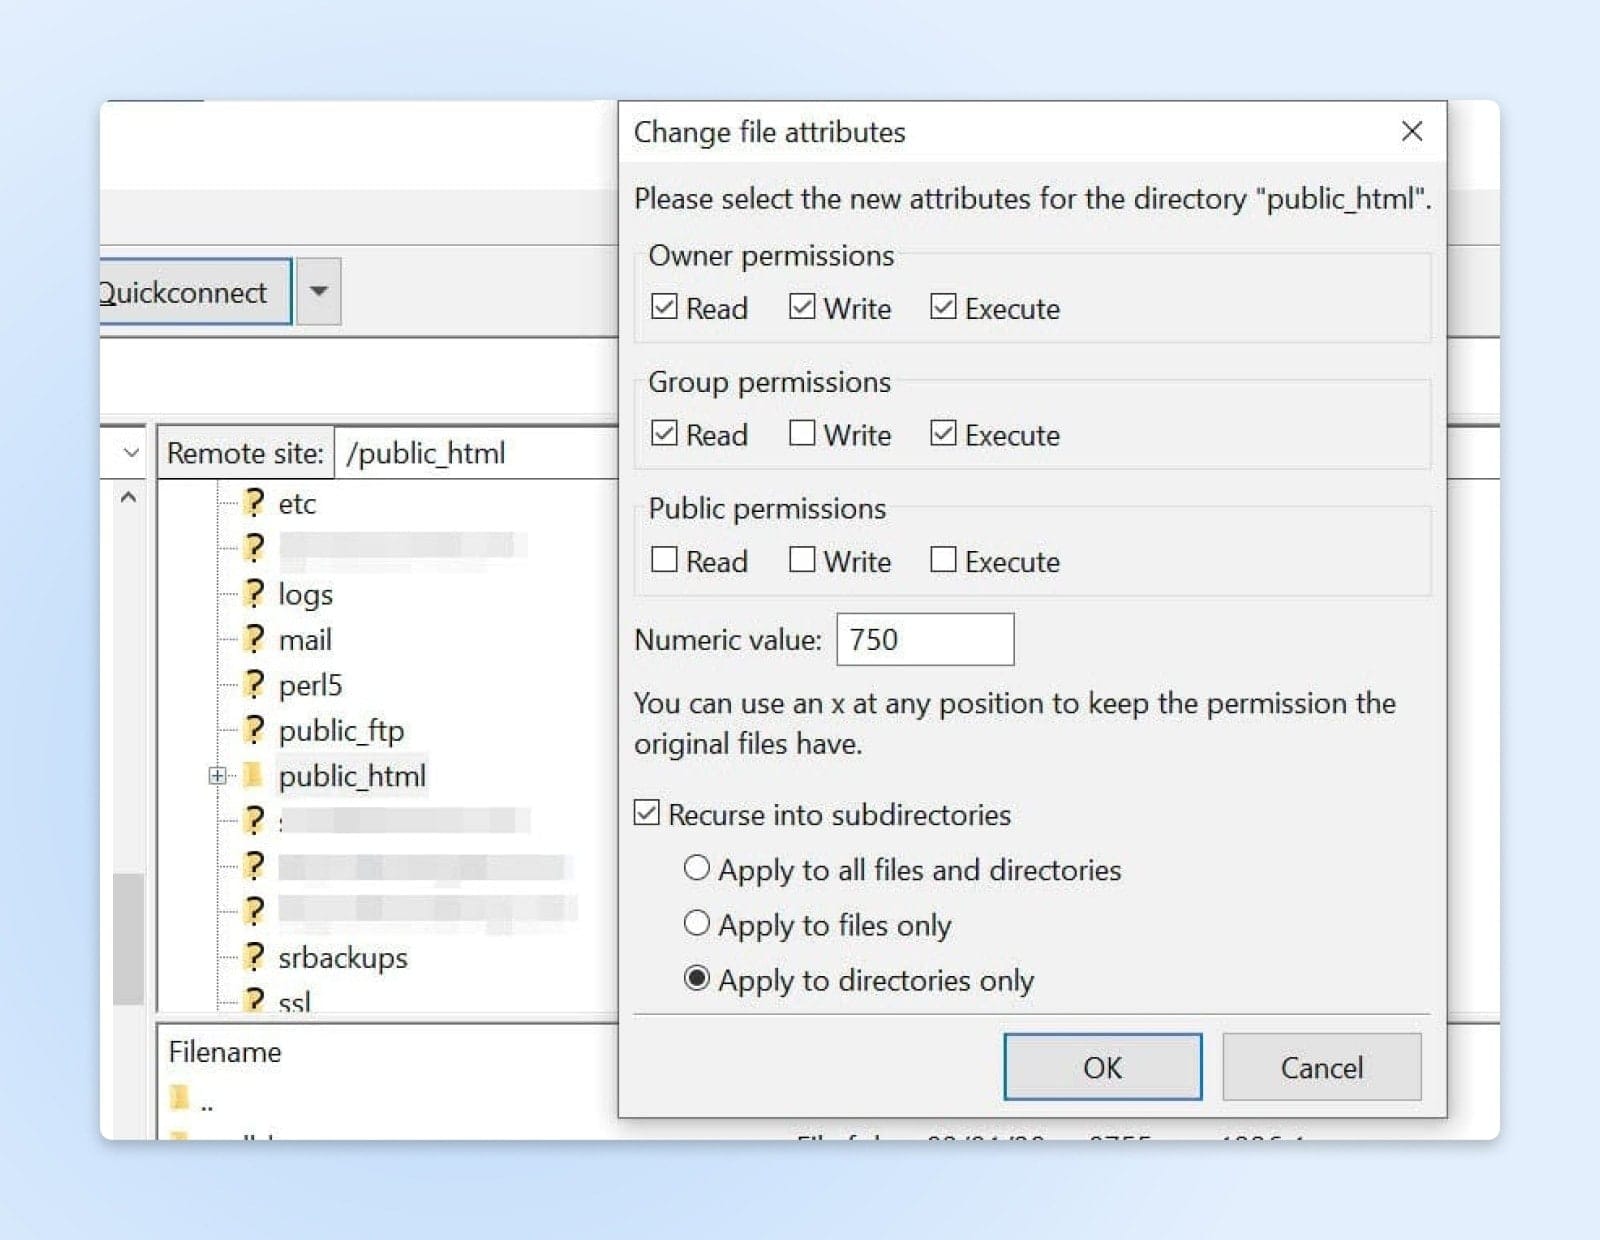
As we covered within the last section, you possibly can access your website either through S/FTP client or a file manager app. When you accomplish that, you’ll need to search out your “public_html” folder or whichever folder accommodates all your website files within the directory browsing window.
Then, right-click on it and select File Attributes.
Within the popup window, locate the Numeric field and enter “755” or “750” in the worth box. Then select the “Recurse into subdirectories” and “Apply to directories only” options, and click on on “OK.”
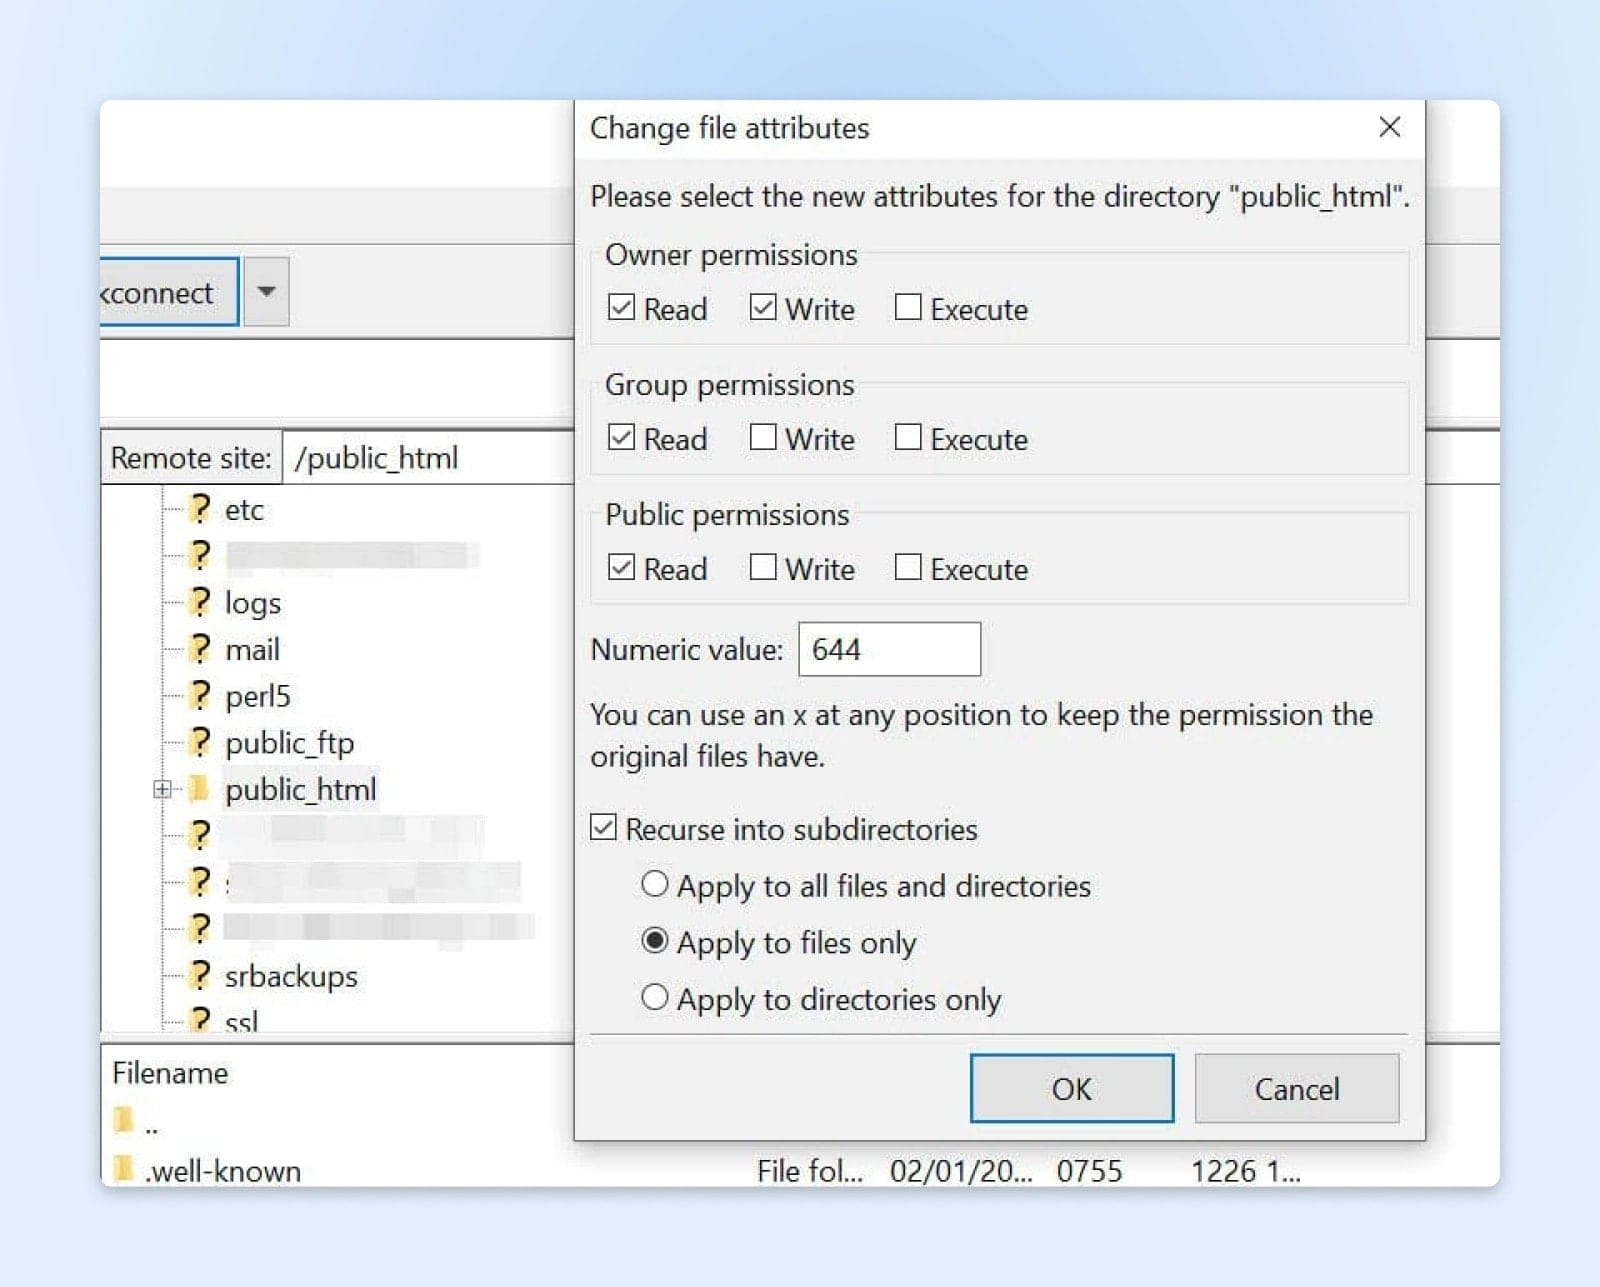
To date, you’ve applied the proper folder permissions just on your directories. You’ll now do the identical thing on your files.
To begin, right-click in your public_html folder and choose File Attributes. This time, you’ll must type “644” within the Numeric value field. Then select Recurse into subdirectories, select Apply to files only, and click on on OK.
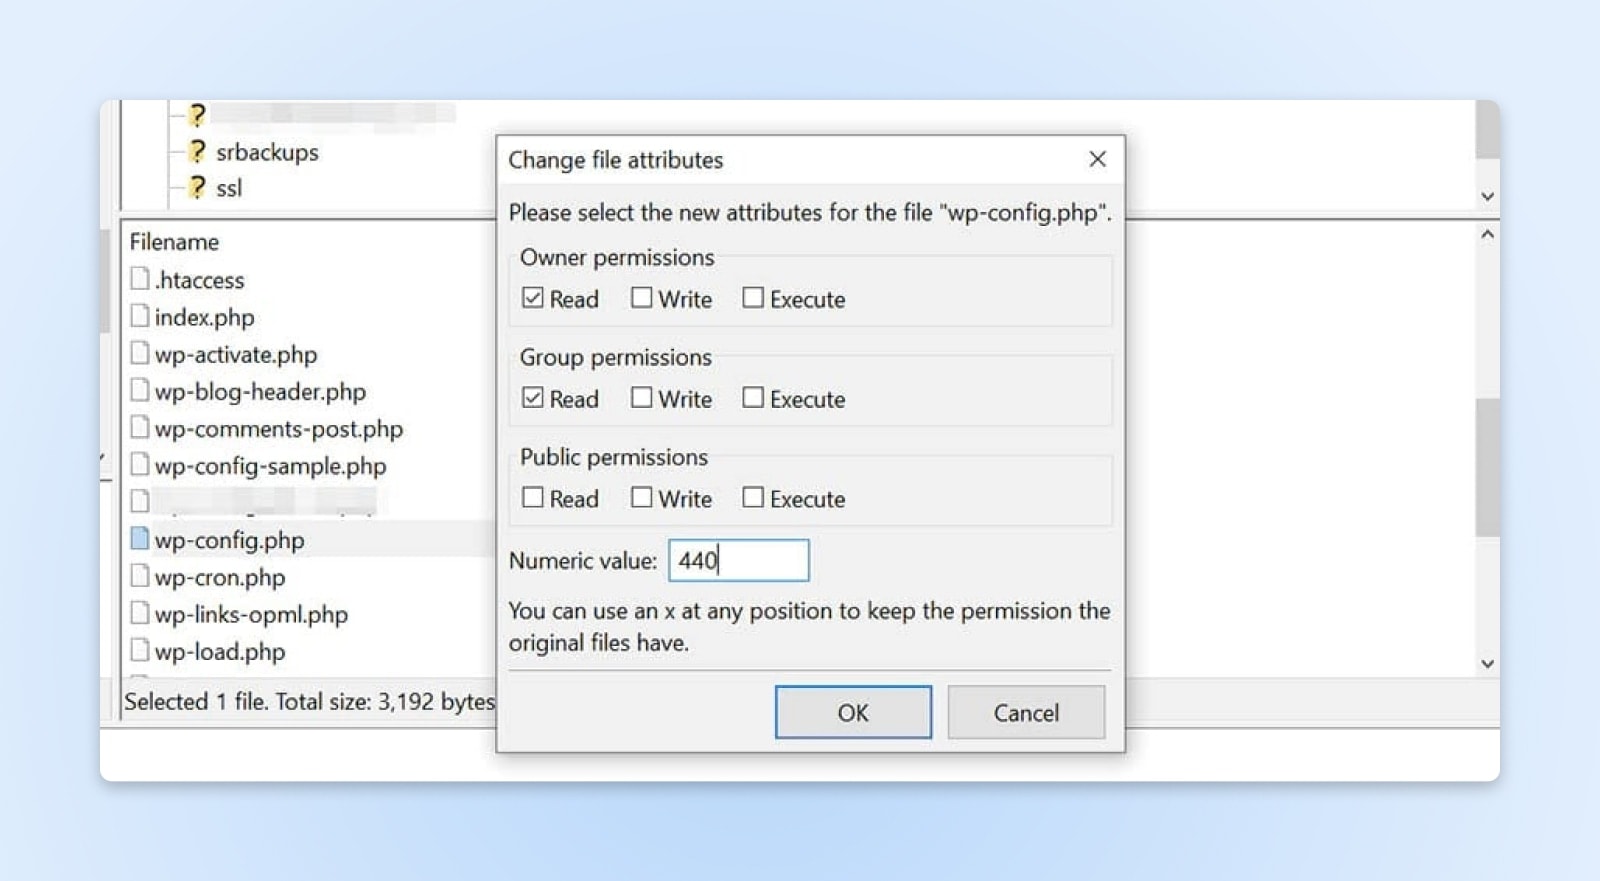
Nerd note: Your wp-config.php file requires a distinct numeric value than those stated here. This unique value prevents other users in your servers from accessing the file. Subsequently, you’ll need to vary its file permission manually.
In your root directory, find the wp-config.php file, right-click, and choose File permissions. Next, set the numeric value to “440”, and click on OK.
Now, every one in every of your WordPress files and folders must have the proper permissions. When you’ve accomplished the above steps, return to your site and check out to breed the 403 Forbidden error. In case your site works wonderful, you don’t must do anything.
Nevertheless, don’t worry in the event you’re still facing the identical problem. There are still a number of more fixes to try.
7. Deactivate Your WordPress Plugins
As we mentioned earlier, the 403 Forbidden error will also be attributable to a faulty plugin. To find out if so, you’ll must deactivate your plugins after which reactivate them individually.
To begin, connect with your site via FileZilla or the file manager in your hosting account. Then, open the wp-content folder in your site’s root directory and locate the plugins folder. Right-click on the plugins folder and choose Rename.
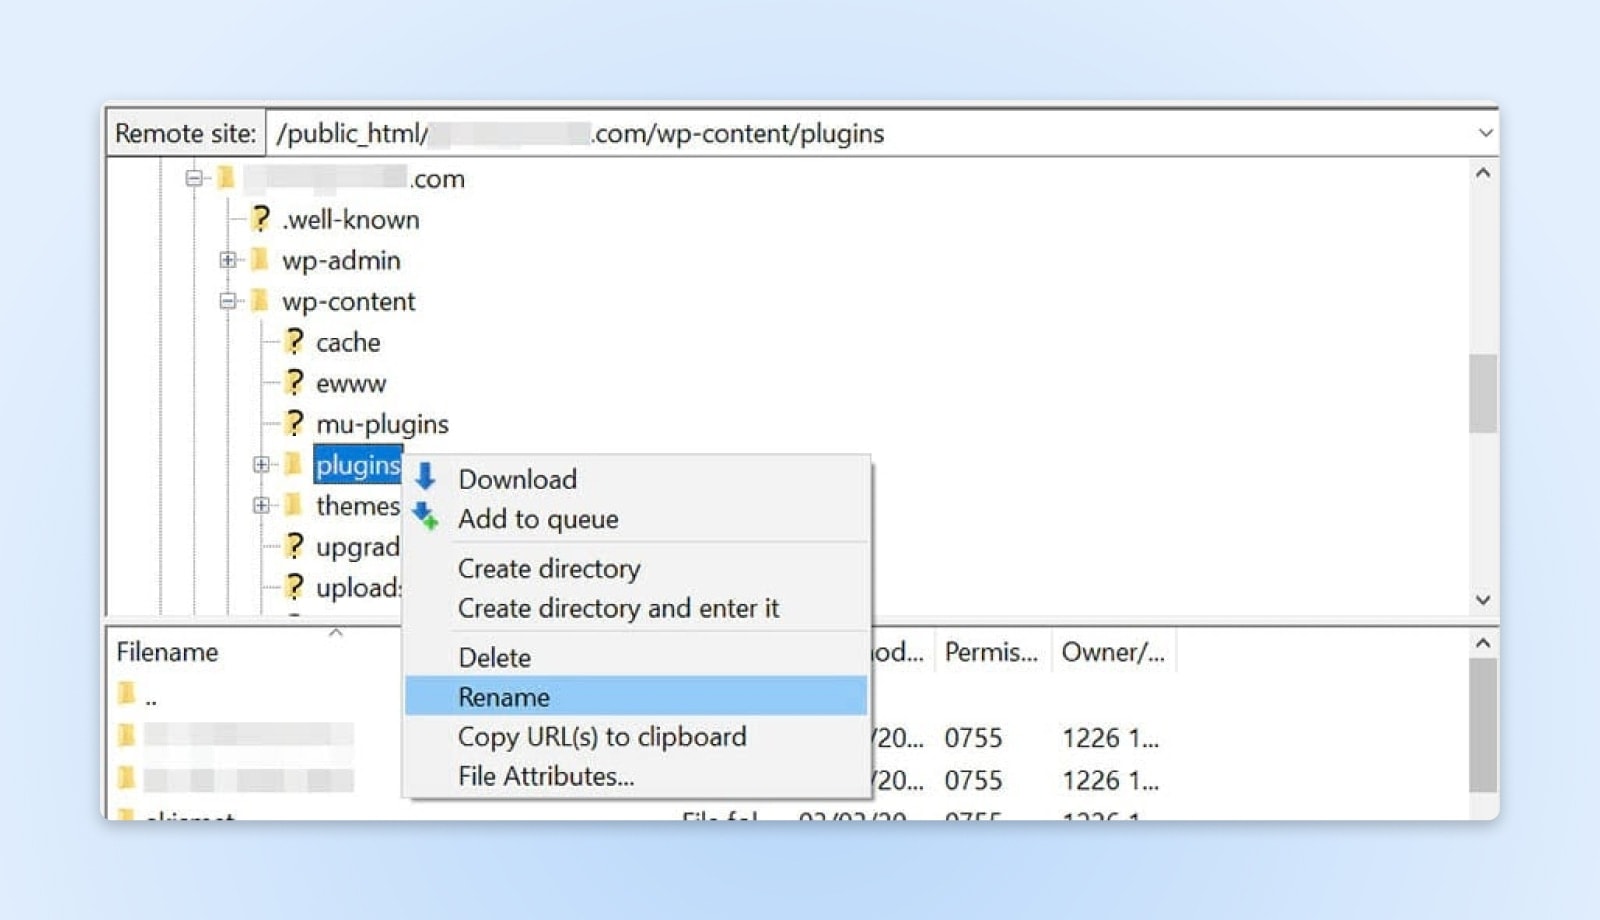
Next, give the folder a brand new name, for instance, “plugins_test”. This may routinely deactivate all your plugins.
In case you can access your site after renaming the folder, then the 403 Forbidden error was attributable to a glitchy plugin. The next step is to search out out which one it’s.
First, return to your site’s root directory and rename the plugins folder back to “plugins”. Then, navigate to the Plugins page in your WordPress dashboard and activate the plugins separately. Keep doing this until you might be capable of reproduce the error.
When you’ve identified the faulty plugin, you possibly can either remove it or contact its developer for support.
8. Delete And Restore The .htaccess File
A corrupt or misconfigured .htaccess file can even trigger the 403 Forbidden error. This file is positioned in your site’s root directory and enables WordPress to interact along with your server.
.htaccess is a file used on Apache web servers. It accommodates rules and directives about your website. If it becomes corrupted or misconfigured, it will possibly create problems just like the 403 error (amongst other things).
How do you fix it?
Inside your site’s root directory, locate the .htaccess file, right-click on it, and select Delete.
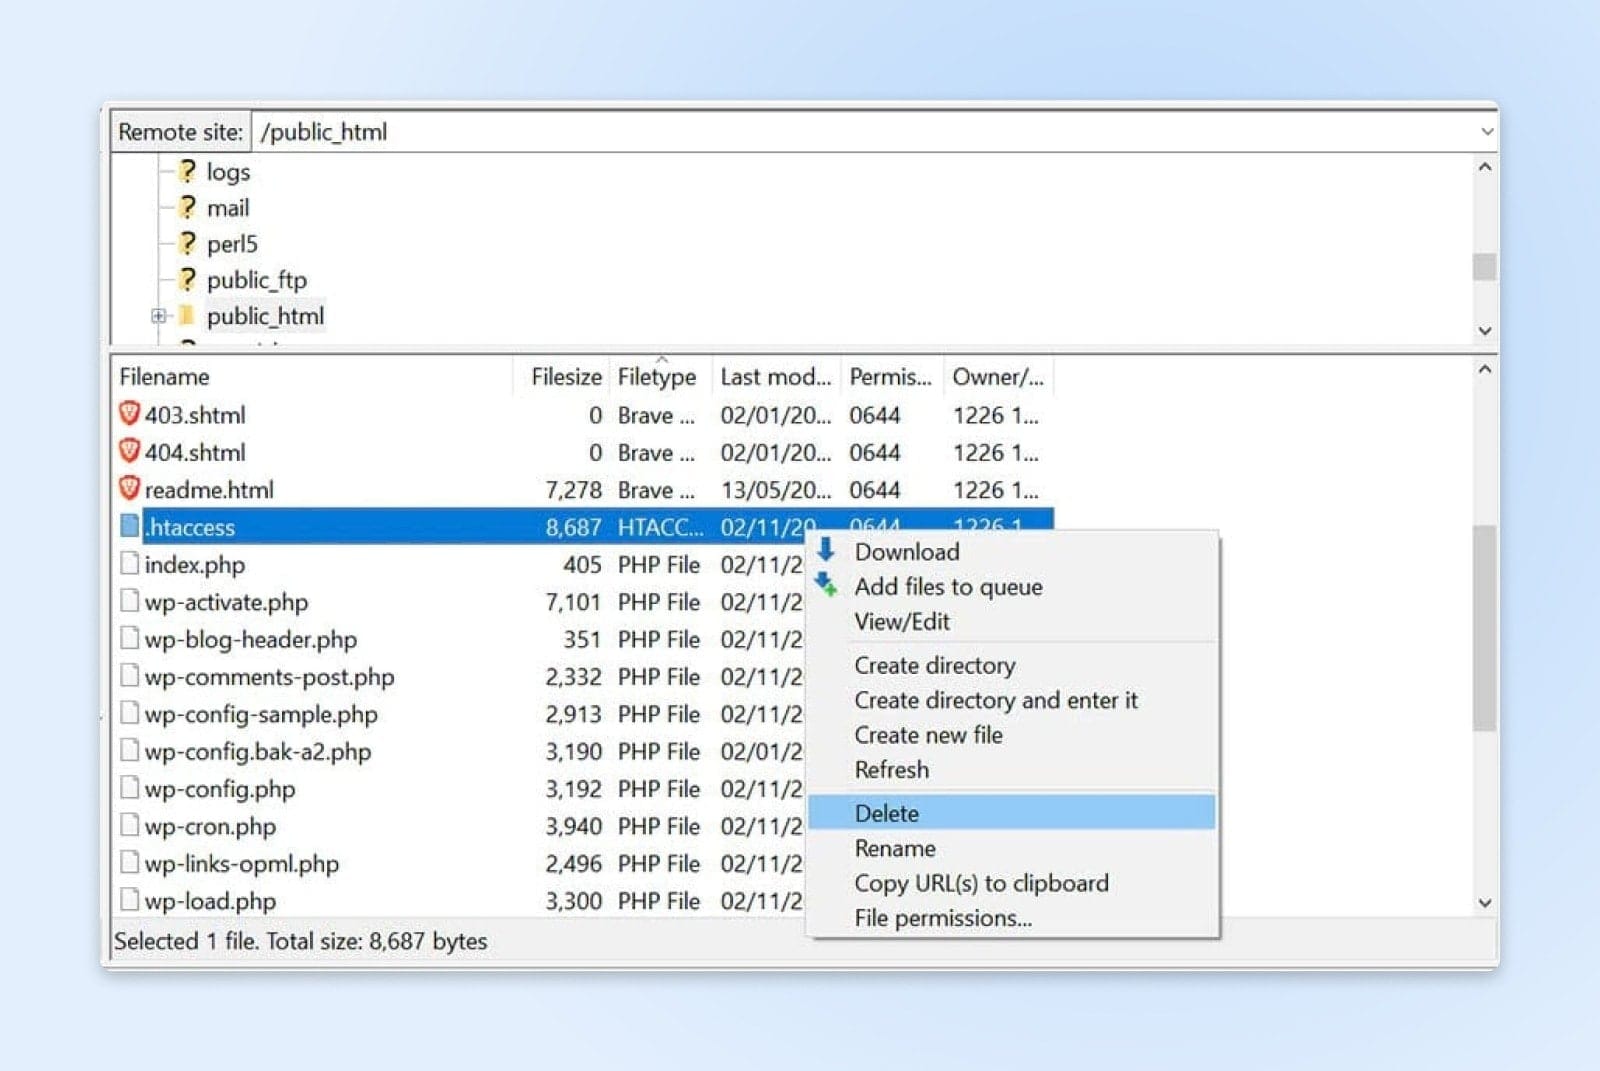
Now, try accessing your site again. If the 403 Forbidden error has disappeared, then your .htaccess file could have been corrupted. This implies you’ll must create a brand new one.
To do that, navigate to Settings in your WordPress dashboard and choose Permalinks. Then click on the Save Changes button at the underside of the page, and a brand new .htaccess file might be generated. You’ll be able to search for the file in your site’s directory to make sure that it has been restored.
9. Deactivate Your CDN
In case you’re still getting the 403 Forbidden error after completing the above steps, you’ll have an issue along with your Content Delivery Network (CDN). This can be a network of servers positioned in several parts of the world, with each server hosting a duplicate of your website. Many hosting plans include a CDN to assist boost your site’s performance.
To see in case your CDN is the explanation for the error, you’ll must temporarily disable it. You’ll be able to do that by logging into your hosting account and locating your CDN settings. In case you’re unable to access your CDN, we recommend getting in contact along with your hosting provider.
10. Check Your Hotlink Protection
Finally, you would possibly want to examine your site’s hotlink protection.
Hotlinking is when someone embeds media files on their site by linking them directly from one other site. Some individuals may do that to make use of one other site owner’s bandwidth (somewhat than their very own), which is effectively theft.
Some hosts and CDN providers offer hotlink protection.
Nevertheless, if this will not be arrange properly, it will possibly trigger a 403 Forbidden error in your site.
Subsequently, it’s possible you’ll need to contact your web host about this issue. While it’s possible you’ll need to look into this yourself, it’s best to get help from a technical expert to make sure that your hotlink protection is configured accurately.
11. Contact Your Web Host
If all else fails, ask for help.
Your website hosting company’s support team should have the ability to offer additional steps and concepts for troubleshooting this issue.
In some cases, it might be triggered by a server configuration problem, changes to the DNS, and even malware or other website attacks.
Additional WordPress Resources
In case you’re recent to WordPress, you’re sure to run into some technical issues while establishing your site. To enable you fix a few of the most typical WordPress errors, we’ve put together several how-to guides:
Meanwhile, in the event you’re in search of more WordPress suggestions and hacks, take a look at our WordPress Tutorials. This collection of guides will enable you arrange and design your first WordPress site like an expert.
Get Content Delivered Straight to Your Inbox
Subscribe to our blog and receive great content identical to this delivered straight to your inbox.