
Blog
How one can Fix WordPress Error 404 Not Found

Oct
You’ve likely seen the “Page Not Found” error before.
Unfortunately, should you operate a web site of any sort (WordPress or not), the day will probably come once you see the message on one in all your own pages.
Fortunately, like many common WordPress errors, 404s are relatively easy to troubleshoot and fix. The answer often involves restoring your site’s permalink structure — something you’ll be able to do in only just a few minutes.
In this text, we’ll explain just what a 404 error is and what may cause one in your site. Then, we’ll walk you thru how one can fix it in 4 easy steps.
Let’s start!
An Overview Of The WordPress 404 Error
A 404 error, also often called a “Page Not Found” error, indicates that your browser can’t locate the page you’re attempting to access.
The precise message can look a bit different depending on the browser you’re using, but it’ll generally all the time contain either the “404” code or a “page not found” message of some kind.
Website owners may create their very own custom 404 Not Found pages. For instance, here’s what our (very cool, we’d add) 404 page looks like:
Seeing this notification (or another error message) when attempting to access your site will be frustrating. While there’s a probability that your post has actually gone missing, the overwhelming majority of the time, there’s a more benign cause.
Some common reasons WordPress posts might return 404 errors include:
- A mistyped URL – It could simply be attributed to a typo within the URL. That is probably the most common cause.
- A problem together with your Domain Name System (DNS) settings – In case you’ve recently updated any of your DNS information and see this error, it might be since the changes haven’t propagated fully. It might probably take as much as 48 hours for this process to finish.
- Problems with add-ons or the structure of your site – WordPress permalink problems will be brought on by a missing, broken, or corrupted .htaccess PHP file. Compatibility issues with WordPress components, corresponding to plugins and themes, is also the perpetrator.
Whatever the cause, this error prevents access to your site and might scare off users and potential customers. So, it must be resolved as quickly as possible. That is why, shortly, we’ll walk through troubleshooting and resolving probably the most common causes behind the WordPress 404 error.
Get Content Delivered Straight to Your Inbox
Subscribe to our blog and receive great content similar to this delivered straight to your inbox.
Why 404 Errors Matter
404 errors pose several problems for a web site beyond simply stopping you from accessing pages.
First, they create a poor user experience (UX).
If you land on a page that doesn’t have what you were in search of — or much of anything for that matter — what do you do?
You allow. Return to the search engine — And possibly avoid clicking on anything from that site again resulting from lack of trust.
If there are even a few of those errors in your site, they’ll absolutely turn away users (and potential buyers.)
Within the worst-case scenario, those visitors could land on a competing website as an alternative, costing you business.
Moreover, 404 errors may hurt your search engine marketing (search engine optimisation). Search engine crawlers won’t index a page that returns a 404 because they think it doesn’t exist.
Get enough of those non-existent pages in your website, and also you’ll start training serps that your site is filled with low-value content. You’ll begin to trail after your competitors within the search engine results pages (SERPs).
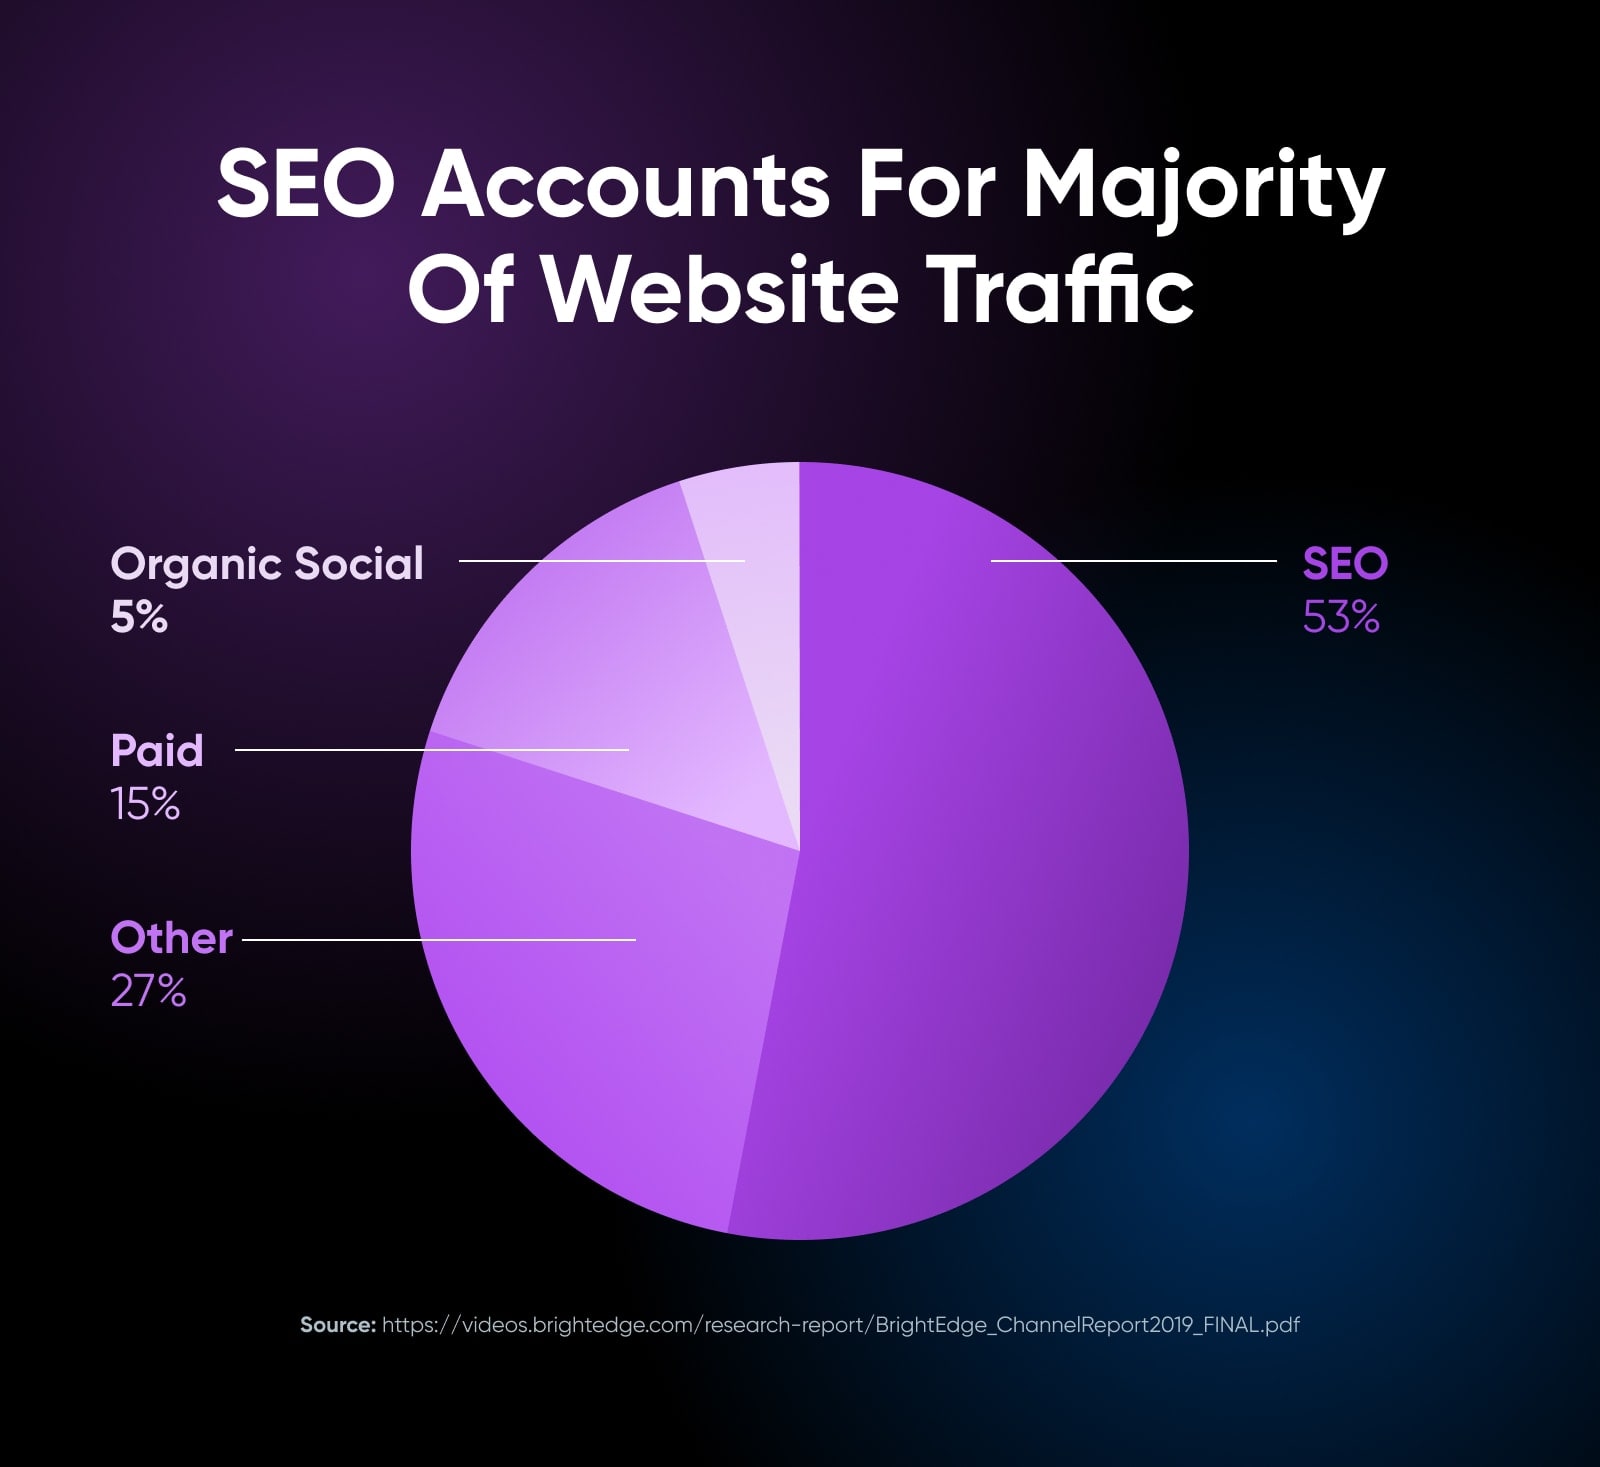
This matters because search engine optimisation is the primary driver of traffic to web sites.
What To Do *Before* Troubleshooting The WordPress 404 Error
Apprehensive about scaring off leads and serps?
We’re here to assist — but don’t do anything in a rush!
Just before you dive into changing your permalink settings or accessing your .htaccess file, it’s a sensible idea to create a backup of your website and database. This fashion, should you by chance make something worse, you’ll be able to easily restore your site to a functioning state.
In case your WordPress website is hosted with DreamHost, backups couldn’t be easier.
We provide easy one-click backups for each customer. And with one in all our managed WordPress hosting plans, day by day backups are automatic — so that you’ll all the time have a fresh copy to access.
You can too create a manual backup by following our guide to How one can Back Up Your WordPress Website.
Related: How one can Select a Web Hosting Provider — 15-Point Checklist
How To Fix WordPress Posts Returning 404 Error (4 Steps)
With a fresh backup of your site in hand, it’s time to get to work solving your problem.
Tip: One of the best technique to navigate this step-by-step guide is to follow it so as, enacting each change so as and checking if the error has been resolved after every one.
Step 1: Reset Your WordPress Permalinks
Step one to try is resetting your permalinks.
Head to your WordPress dashboard and navigate to Settings > Permalinks.
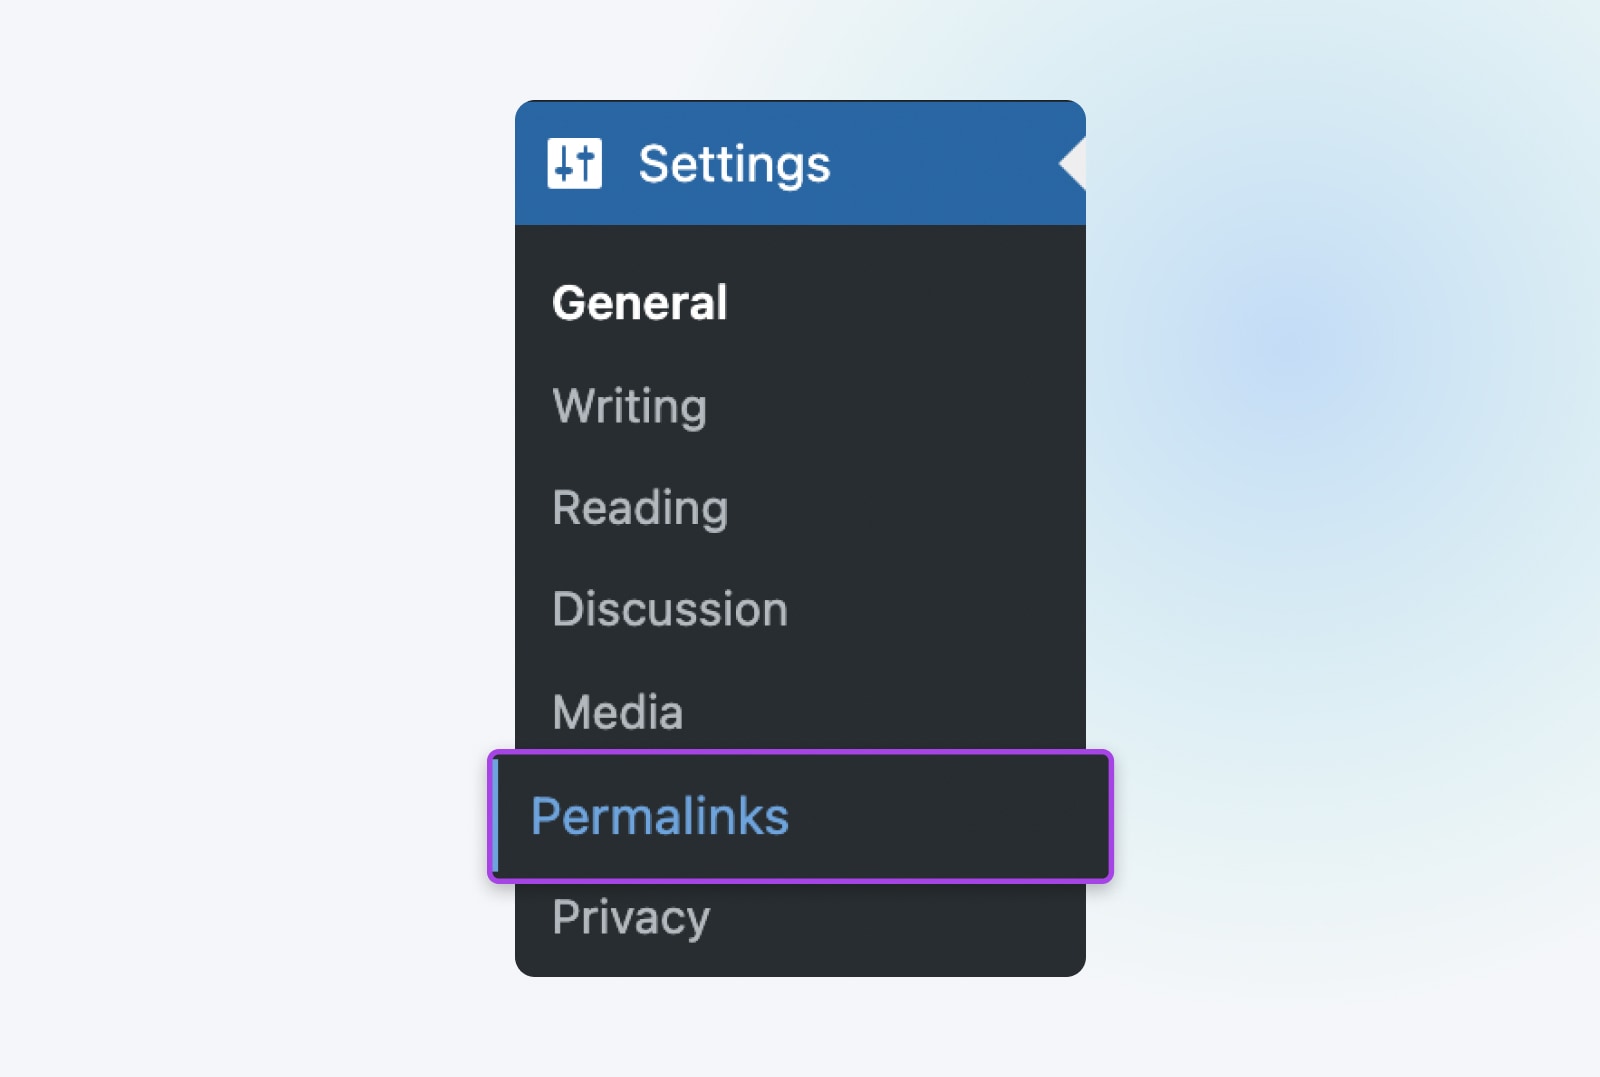
From here, just click on Save Changes at the underside of the screen.
Seriously, that’s it.
You don’t really want to edit anything. Clicking that button will update the permalink settings even should you don’t make any changes. This is significant since it also refreshes the rewrite rules used for “pretty permalinks.” Without these rules that resolve pretty permalinks, any pages that use them would display the 404 Page Not found error.
With this done, go ahead and reload the pages you were attempting to access. If the whole lot works, you’re all done!
In case you still get a 404 error, head to the following step.
Step 2: Restore Your .htaccess File
If resetting your permalinks didn’t work, the following strategy is restoring your .htaccess file. This controls how WordPress interacts with the net server and the way it generates permalinks to your pages. Restoring it to the default settings can fix sudden 404 errors.
To revive the .htaccess file, you’ll have to open it up and make some easy edits. There are just a few ways to do that.
You need to use a Secure File Transfer Protocol (SFTP) client, corresponding to FileZilla. We’ve got detailed instructions for connecting via SFTP should you need assistance.
In case you’re using DreamHost, you should utilize the built-in file manager. This guide from our knowledge base will walk you thru accessing and utilizing the DreamHost file manager.
Once you could have the file manager open, select the folder that corresponds to your domain name. You’ll find the .htaccess file inside (should you see items corresponding to “wp-content,” you’re in the appropriate place!)
Just in case anything goes flawed, first copy the present contents of the .htaccess file and paste them somewhere for safekeeping.
Then, replace the contents of the .htaccess file with the next:
# BEGIN WordPress
RewriteEngine On
RewriteBase /
RewriteRule ^index.php$ - [L]
RewriteCond %{REQUEST_FILENAME} !-f
RewriteCond %{REQUEST_FILENAME} !-d
RewriteRule . /index.php [L]
# END WordPress
That is the default .htaccess code for WordPress. When you’ve pasted this in and saved your changes, your restoration is nearly complete!
We are saying almost because restoring this file will even reset the permalink settings to your WordPress site. Subsequently, should you’re using a custom permalink structure (or have modified it in any respect from the default), you now need to revive those settings.
To achieve this, head back to your WordPress dashboard and navigate to Settings > Permalinks (similar to step 1 above). Restore your chosen settings then Save Changes.
Finally, refresh your website and try and load the pages that were returning 404 errors.
If the whole lot works now, congratulations!
If not, proceed again to the following step.
Step 3: Disable Your WordPress Plugins And Theme
In case you’ve reset your permalinks and .htaccess file but you’re still seeing 404 errors in your site, the following step is to ascertain your WordPress theme and plugins.
Plugins, particularly, can sometimes have bugs or compatibility issues that prevent a site from loading.
So, let’s start there.
The fundamental idea is to disable them one after the other, checking on those 404s every time. If the error persists, turn it back on and move to the following one.
To start, head to your WordPress dashboard and navigate to Plugins > Installed Plugins.
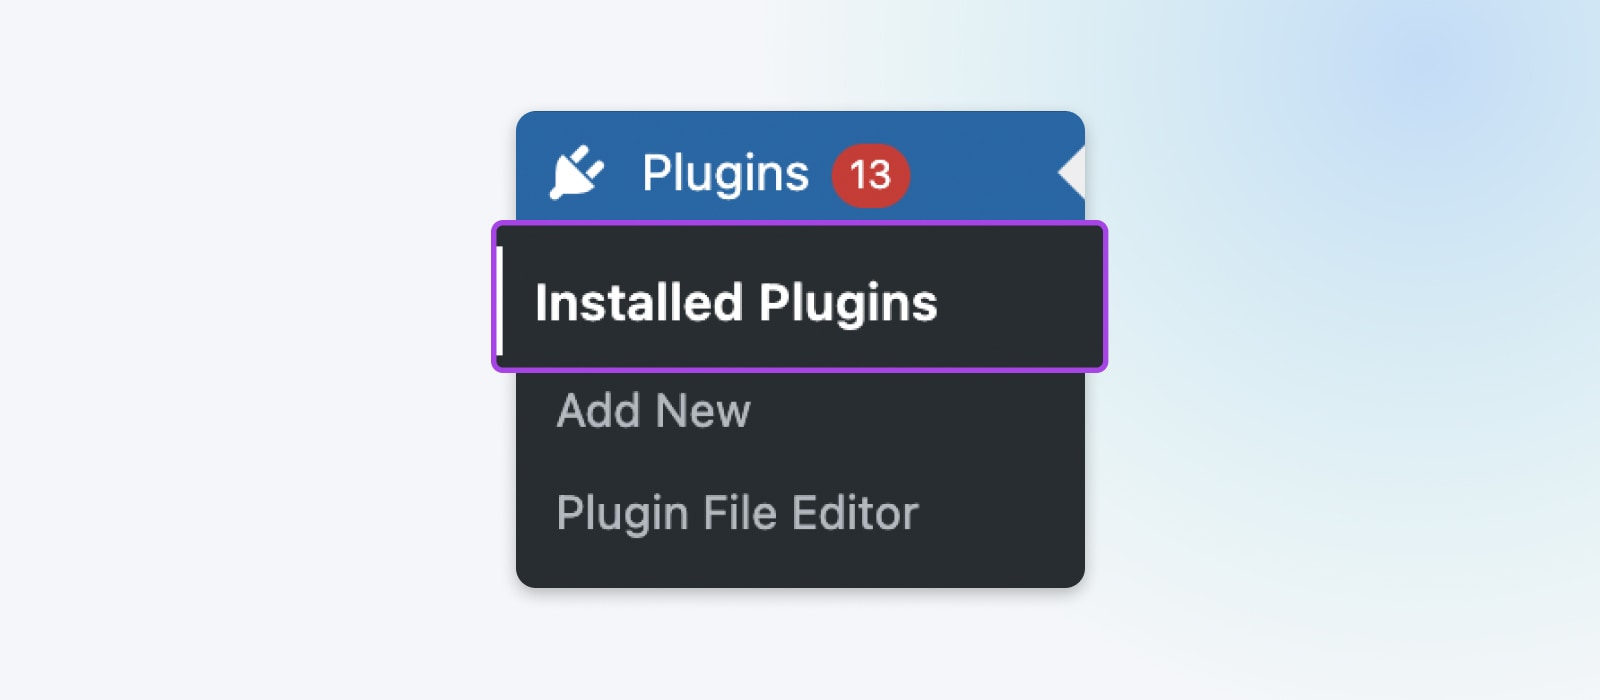
Locate and click on the Deactivate button related to the highest lively plugin on the screen. (Lively plugins must have a blue background. Inactive ones must have a white background and no choice to deactivate.)

Now, refresh your site and see if the 404 error continues to be occurring.
In case you get the dreaded error message, head back to the plugins, re-activate the one you simply tried, and move to the following lively one on the list.
In case you find one which resolves the difficulty, you’ll be able to check if the plugin has an update that will resolve the issue. If updating it after which refreshing yet another time doesn’t work, search for an alternate plugin with similar functionality.
But when none of the plugins prove to be the difficulty, it’s time to try changing your WordPress theme.
To try this, head to Appearance > Themes.
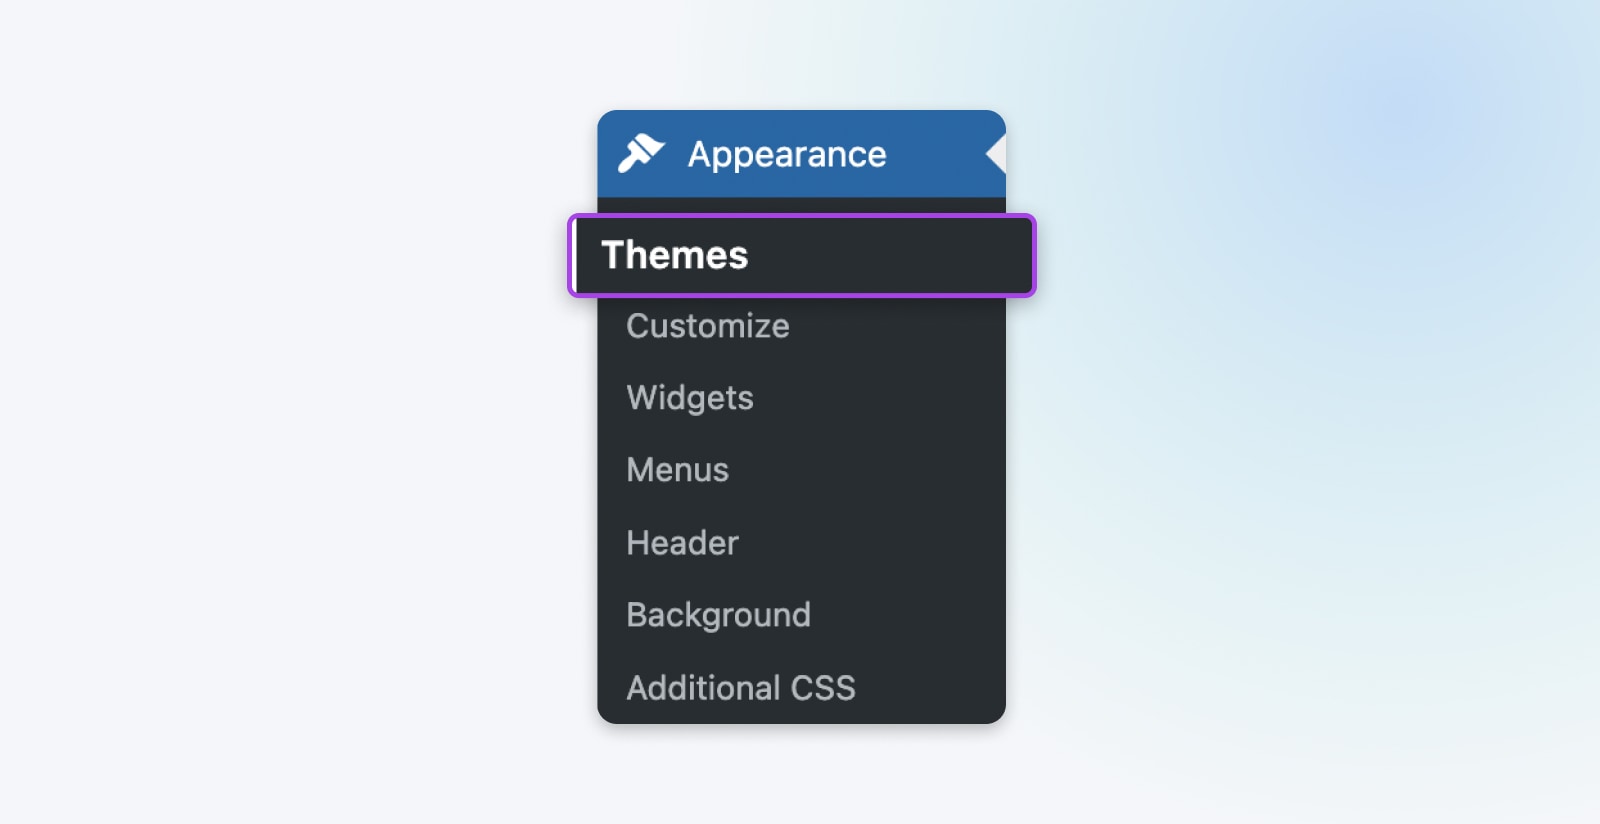
Your currently-active theme is marked as such. Hover over one in all the others and click on on Activate. Then, refresh your site and take a look at to access the problematic page again.
Note that changing your theme can alter your site significantly. Moreover, should you’ve made any edits to your theme, those will be lost in case your theme is modified and even updated. So, again, spend a while backing up your site before you go clicking around inside your themes.
In case you find yourself finding that it’s your theme that’s the difficulty, you might have to spend a while finding one that gives the same look and features.
Need assistance? Take a look at 18 Pro Suggestions For Selecting The Perfect WordPress Theme.
Step 4 (Bonus): Set Up A 301 Redirect For Moved Content
Just in case you do have to move content to a brand new URL and don’t want the old one to throw a 404 error, here’s one final step.
You’ll need to arrange some 301 redirects to point that old URL to the brand new one.
The best technique to do that is with the Redirection plugin. This tool will enable you to quickly arrange the redirects you would like. Plus, it’s free and user-friendly.
Related: How one can Fix the “Too Many Redirects” Error in WordPress (13 Methods)
How To Create Your Own “Error 404 Not Found” Page
If you should arrange your personal custom 404 error page, you’ll be able to achieve this relatively easily.
The 404page plugin is a extremely popular option for quickly making a custom error page.
Or, you’ll be able to take a more hands-on approach and do it manually. This continues to be pretty easy and only requires adding one line of code to the .htaccess file (accessed via your file manager, like in step 2 above) to focus on the error to a selected page. Then, you simply must create that recent page.
We’ve got full instructions for organising custom error pages to walk you thru the method.
Finally, if you should keep a watch out for 404 errors in the longer term, you’ll be able to achieve this with just a few handy tools.
In case you’re using Google Analytics to grasp website traffic, you too can use it to seek out 404 errors in your site. Databox has a guide on how.
Google Search Console will even show you crawl errors that the Google bots have come across as they indexed your site. This is a straightforward technique to see all the problems Google is encountering.
You can too enter your URL right into a specialized tool corresponding to the Broken Link Checker, which is able to scan your entire site for broken links and let you understand if it finds a 404 page. It’s free and straightforward to make use of.
More WordPress Error Tutorials
Need to learn how one can fix other common WordPress errors? We’ve created a robust series of guides to assist!
Check ‘em out:
Let Us Handle Those WordPress 404 Errors
A 404 error will be frustrating — especially when it happens on your personal site.
These messages cause problems with search engine optimisation and spoil your site’s UX. Fortunately, they’re not too difficult to resolve.
Fixing 404 web pages generally involves restoring your site’s permalink structure and organising redirects for any posts which might be actually gone. You possibly can then use tools, corresponding to Google Search Console, to observe your site for future 404s.
If you should spend less time coping with errors, consider switching to managed WordPress hosting from DreamHost.
You possibly can engage our Development Pro Services teams on a retainer or on-demand basis to take website management off your page, so you’ll be able to get back to business!