
Blog
How To Use WordPress Blocks

Aug
Would this be a weird place to say how my wife is holding onto a mint-condition, unopened, limited-edition Lego Star Wars BB-8 kit?
Those things are going for like $500!
Okay. It will be weird. Got it, loud and clear… But it will all make a bit more sense in a second.
On this post, we’re going to cover the whole lot you want to learn about WordPress blocks. In the event you’re an old-school WP user like myself, you then probably still consider blocks as “latest” WordPress since you began by utilizing the classic editor.
It’s been over five years since WordPress introduced blocks, but they’re still one of the vital misunderstood and underutilized CMS features.
WordPress blocks are type of like Legos —see, I told you it could tie back in — they can help you construct and customize your website in a way that might’ve required hiring an expert website designer and developer just a couple of short years ago.
And that’s one in every of the explanation why people love them a lot. Once they understand them, that’s.
After I explain how they work, there’s little question that you just’ll love them too.
What Are WordPress Blocks?
WordPress blocks are, because the name suggests, like stackable constructing blocks which you can add to pages and posts in your WordPress site.
They were added to WordPress 5.0 together with the inclusion of the Gutenberg editor that almost all of us at the moment are acquainted with. Blocks at the moment are the usual approach to customize your WordPress site — and you need to use blocks across your entire site, not only inside posts.
Give it some thought type of like a site or page builder. You may click the “+” button so as to add a block to a page or post after which select from various block options. The present version of WordPress comes with 90+ options out of the box.
Each block is actually a widget. They will do various things, like embed content from one other site or service, add latest functionality like calendars or contact forms to the page, and even add specific content with predefined formatting.
Plus, most blocks have customization options that can help you adjust how they display or function in your site.
The WordPress block editor is an enormous upgrade from the classic editor. Within the pre-Gutenberg days, WordPress users could only add text and pictures to a post before having to dive into custom code.
Nerd note: If for some reason, you don’t have access to blocks from the WordPress editor, it might be for one in every of two reasons: One is that your WordPress installation might be horribly outdated (like years and years old). Secondly, it’s possible that the block editor has been disabled by the Classic Editor plugin. When energetic on a WordPress site, this plugin reverts you back to the classic editor experience. Check your plugins page from wp-admin to work out if that’s the case for you.
Get Content Delivered Straight to Your Inbox
Subscribe to our blog and receive great content identical to this delivered straight to your inbox.
What Blocks Does WordPress Already Have?
By default, the block editor offers a huge variety of available blocks. You should use these blocks to customize your WordPress theme, allow writers and bloggers so as to add wealthy content to their posts, pull in social media content, and so far more.
Let’s have a look at a number of the hottest and helpful default Gutenberg blocks.
Most Common Blocks
Adding any sort of text or image is completed using a block. Which means essentially the most common blocks are generally the several styles and forms of text or image elements you would possibly add to a page.
Things like:
- Text Block — Each paragraph you write within the block editor resides in its own text block, but text blocks aren’t limited to paragraphs. Write just a little or write rather a lot.
- Image Block — For when you would like to show in addition to tell, throw a picture in the combination for some added flair.
- List Block — Need to put in writing an overview? What about an ordered list? You may do all of it with the list block!
- Image Gallery Block — Sharing vacation photos or product shots never looked so good. 😍
- Table Block — Create a pricing table or share some spreadsheet data with ease.
- Pullquote Block — Wish to call attention to a selected statement? Inspired by a quote that’s relevant to the post you’re writing? Highlight it with the pullquote block!
Each of those is a component which you can add to your website with the block editor. Then, you may position and elegance them throughout the content section of the page.
Embedded Content Blocks
Blocks make it extremely easy to embed outside content and widgets into your WordPress website without having so as to add a brand new plugin or third-party addon.
A number of the hottest embed block types for pulling in outside content:
- Calendly Block
- Custom HTML Block
- Twitter Block
- YouTube Block
- Testimonials
- WooCommerce
- Contact Forms
- FAQs
Using these block types, you may transcend the fundamental text editor and create interactive content that features all types of functionality and features.
Specialty Blocks
Here’s where things get really spicy.
Beyond the fundamentals and embedded content, there are also an enormous number ofadvanced blocks which you can use for special cases. Like perhaps you would like to improve your site’s navigation and UX, or to make use of WordPress as a full-blown site builder.
Listed below are a couple of to examine out:
- Buttons Block
- Columns Block
- Group Block
- Post Carousel Block
- Post Content Block
- Query Loop Block
- Reusable Block
- Shortcode Block
- Table of Contents Block
With these blocks, you may pull in custom content directly from the WordPress database or fully customize the layout, spacing, and flow of every page or post in your website.
That’s all great and dandy.
But what when you need a block that doesn’t include WordPress by default?
Luckily, blocks are also customizable. Identical to widgets, you may add latest blocks and even create your personal to suit the needs of your web site design and template.
How To Create Custom Blocks With A WordPress Plugin
By far, the simplest approach to create a custom block is to make use of a plugin.
The Genesis Custom Blocks plugin makes constructing and launching your personal custom blocks pretty easy. You will want to have a basic understanding of HTML and CSS to create and elegance the block to suit your needs.
With those basic skills, the plugin takes care of all the difficult setup and configuration to implement a brand new block.
Step 1: Install Genesis Block Plugin
First things first: Pop over to the WordPress plugin directory and install the Genesis Custom Block plugin.
(Don’t forget to go to the Plugins tab and activate it.)
Step 2: Add A Recent Block
Once installed and activated, it’s best to see a brand new option from the WP admin panel within the left-hand navigation.
Click Custom Blocks > Add Recent.
Step 3: Customize The Editor Fields
Now, we’re ready to start out constructing the custom block.
Step one can be to establish the fields and customization options that can appear if you’re using the block in your website.
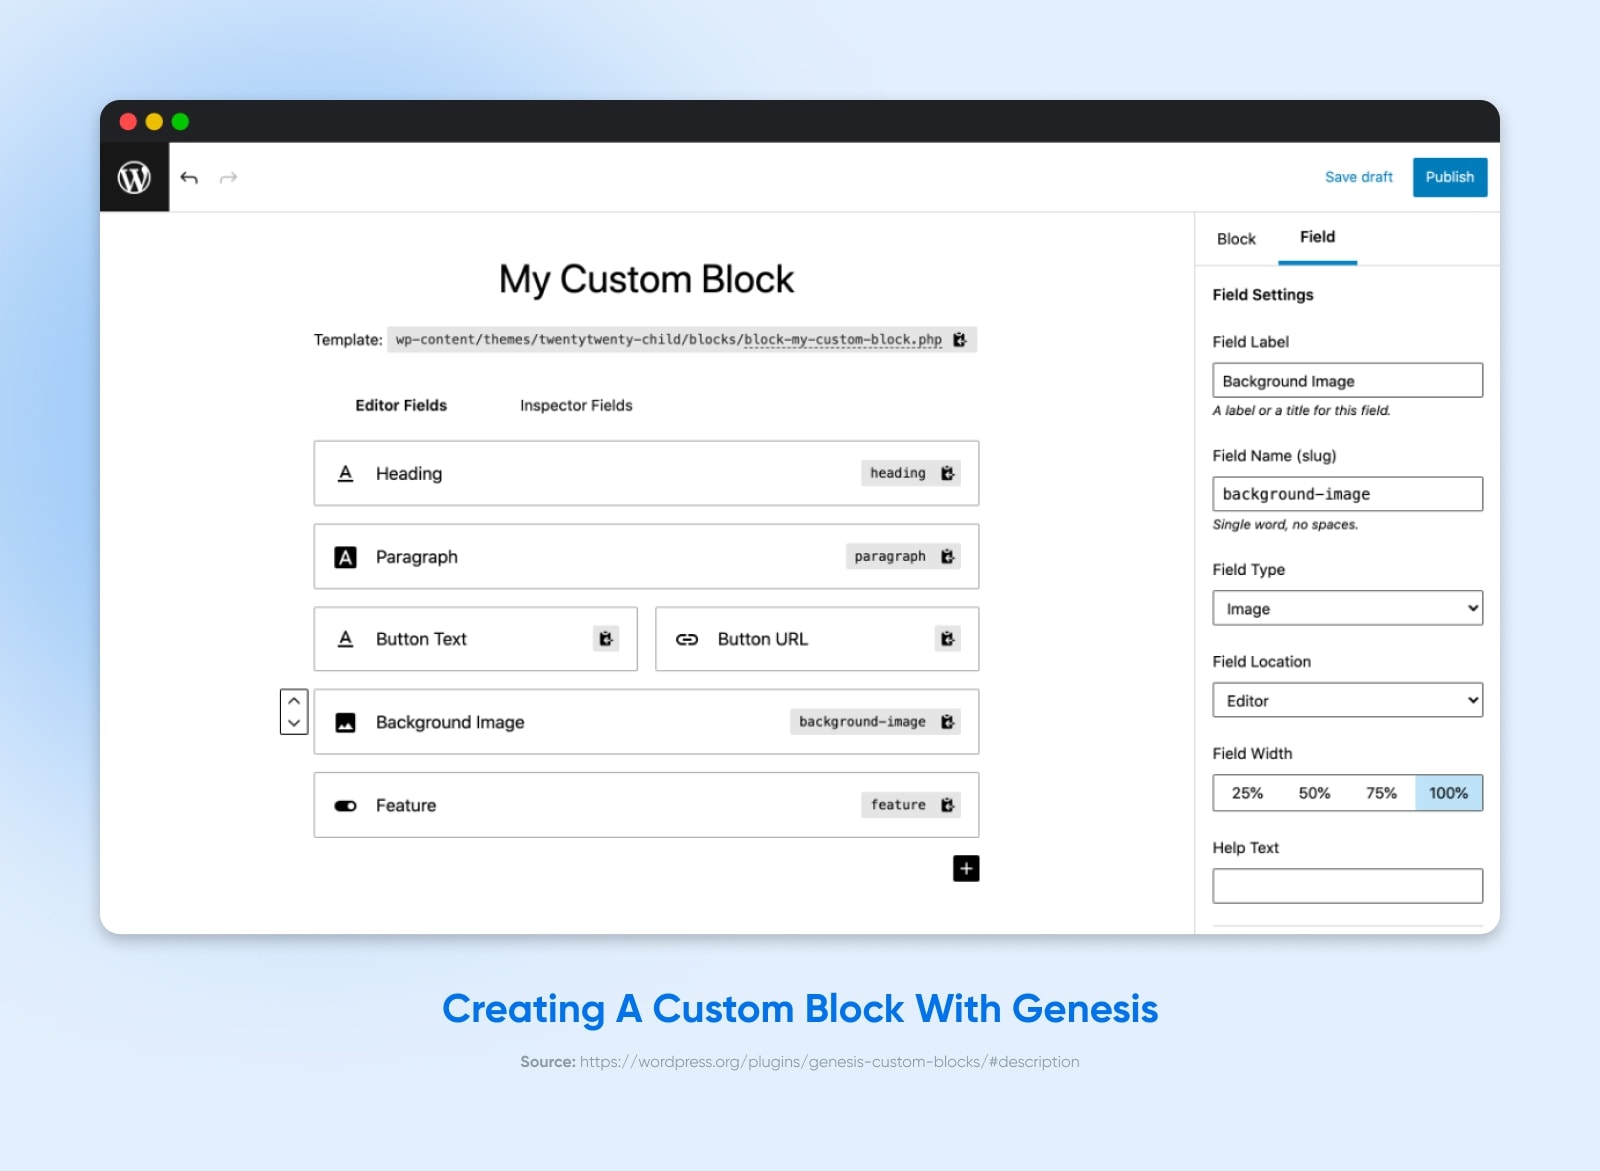
You may consider this type of like a mini version of the block editor itself. You’ll add custom fields and data that can either be pre-filled by the block itself or collected by the editor or user who’s adding the block to a page or post.
For instance, when you’re constructing a custom call-to-action (CTA) block, you would possibly add fields like:
- Headline text
- Subhead text
- Button text
- CTA button URL
Each field can have a label, name, and kind. You may even customize the width or add help text to make it easier for added editors or writers to make use of.
Step 4: Customize The Markup And CSS
Now that we’ve arrange the back end of the block, we want to inform WordPress tips on how to actually display the content that’s being added.
Here’s where any prior HTML or CSS knowledge that you could have will turn out to be useful.
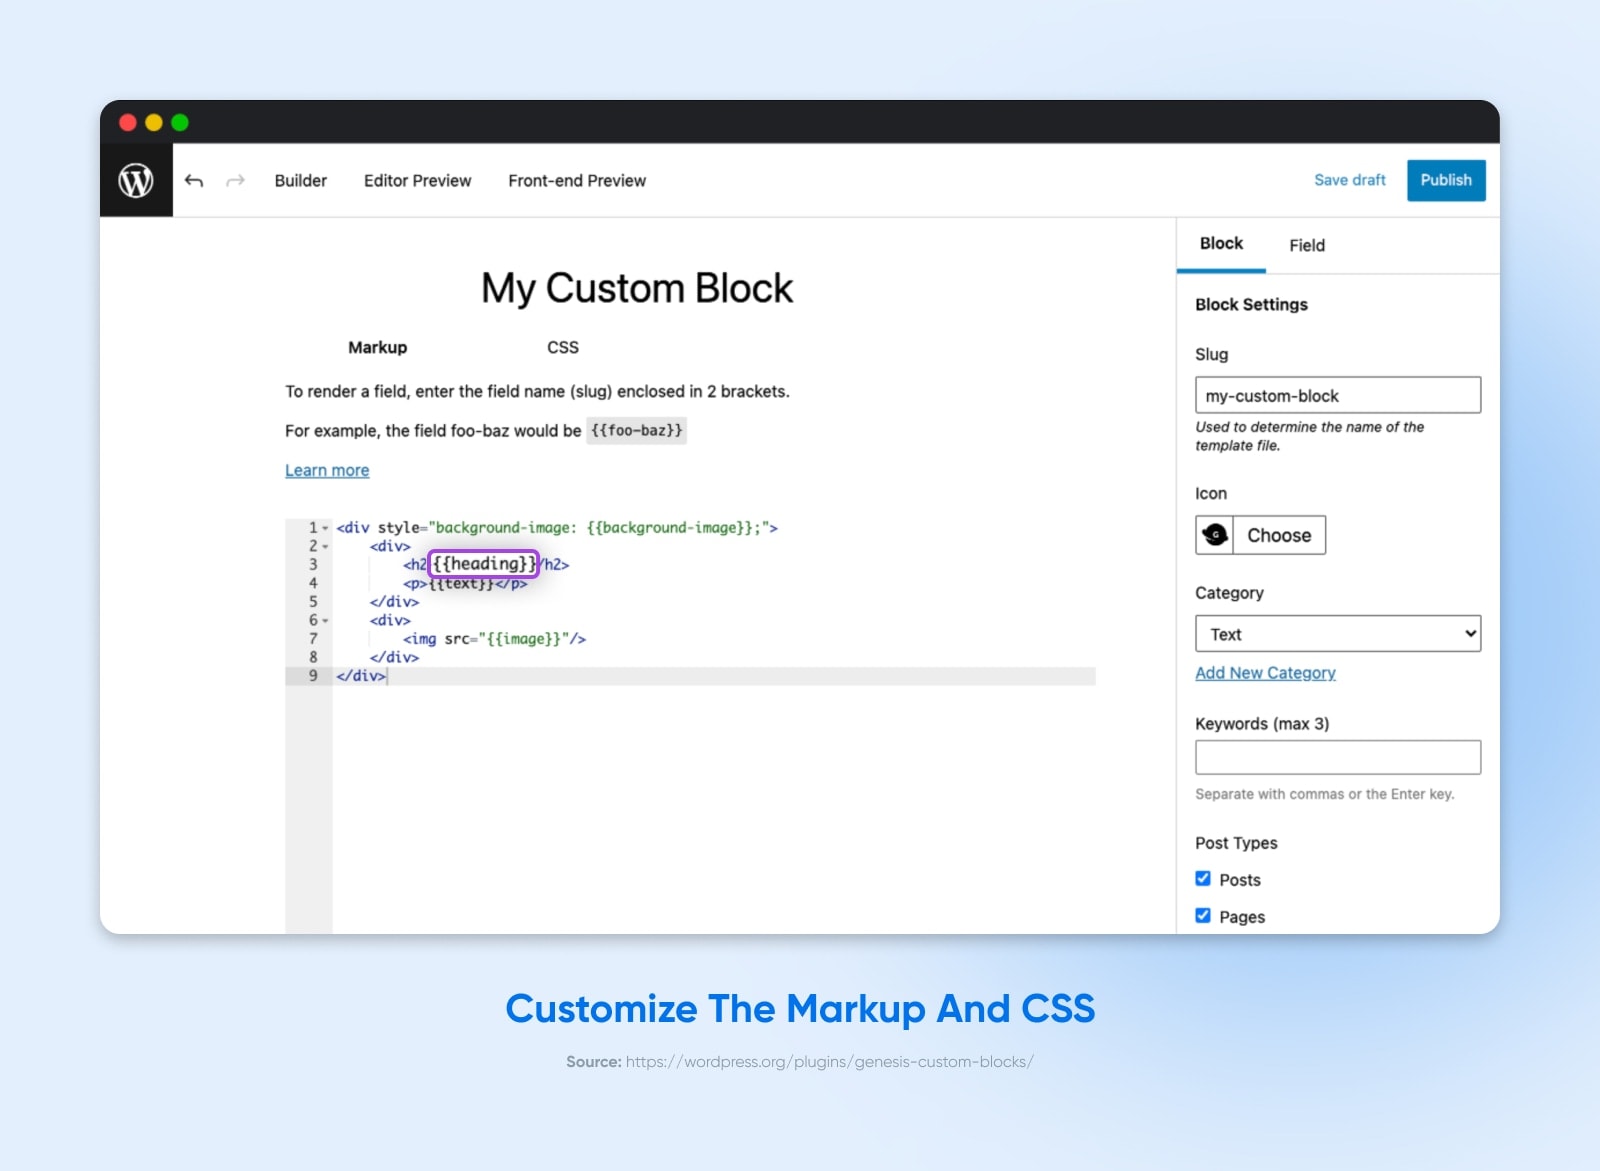
On this next step, you’ll essentially be writing the block of code that can be dynamically generated from the inputs configured for the block editor.
You may write this in vanilla HTML and CSS.
You may also pull within the variables from the block editor using double brackets and the sphere name (slug) from the editor. (E.g.,”{{button-text}}”)
Step 5: Add The Block
When you’ve arrange the block using the Genesis plugin, it should appear within the list of obtainable blocks available within the WordPress Gutenberg editor.
Simply click the “+” after which find the brand new block by its name.
Once added, it’s best to see the Gutenberg block editor screen with the fields and options you configured.
That’s it!
You may now use your custom block, adding it to pages, posts, sidebars, or wherever you wish it.
How To Create Custom WordPress Blocks Without A Plugin
If you would like to dive in deeper and really learn tips on how to create latest blocks from scratch, you’ll need a bit more advanced knowledge.
On this tutorial, we’ll walk through the fundamental steps for using the create-block tool that can can help you spin up fully custom blocks without having to make use of a plugin.
Fair warning: That is a sophisticated workflow. It is going to require you to dig into the command line.
You’ll need to grasp PHP, JavaScript, HTML, and CSS.
Don’t say we didn’t warn ya!
Step #1: Set Up Node.js, NPM, And Local WordPress Installation
Before we will use create-block, we’ll must have the precise setup and access.
Listed below are the prerequisites:
It’s possible you’ll also wish to use nvm (Node version manager) to put in or update a compatible version of Node.js
With this setup, we’ll use NPM’s command “npx” to execute the create-block package directly from its hosted directory within the cloud.
Step #2: Run The create-block Package
Now, the simple step.
From the terminal, navigate to the /wp-content/plugins directory of your website in your local machine.
Then run the create-block package using NPX:
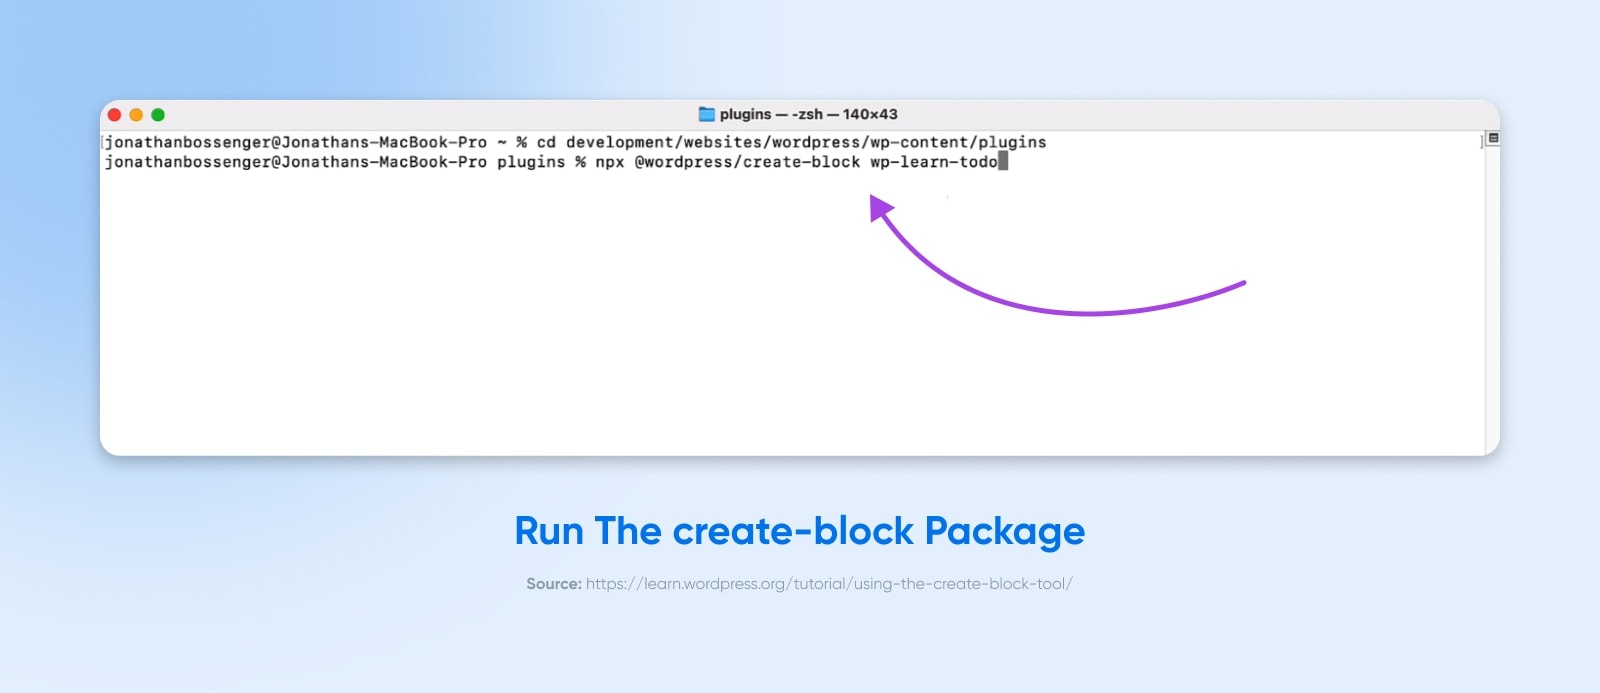
npx @wordpress/create-block {{block-name}}
This package will run through the technique of organising what’s often known as the “block scaffolding”. It is going to register all the relevant elements, spin up the proper file and directory structure, and generate default code for all the block to be each editable and usable.
Step #3: Activate The Plugin
The brand new block itself will take the shape of a plugin.
Once the create-block package is complete, you’ll must pop over to WP admin.
Go to the Plugins page and activate the brand new plugin that it created, which must have the name of the block that you just utilized in your npx command.
Step #4: Customize The Block Code
You’ll customize the content and functionality of the block throughout the /src/ folder contained in the plugin directory.
Index.js is where you’ll register the block and code the most important output:
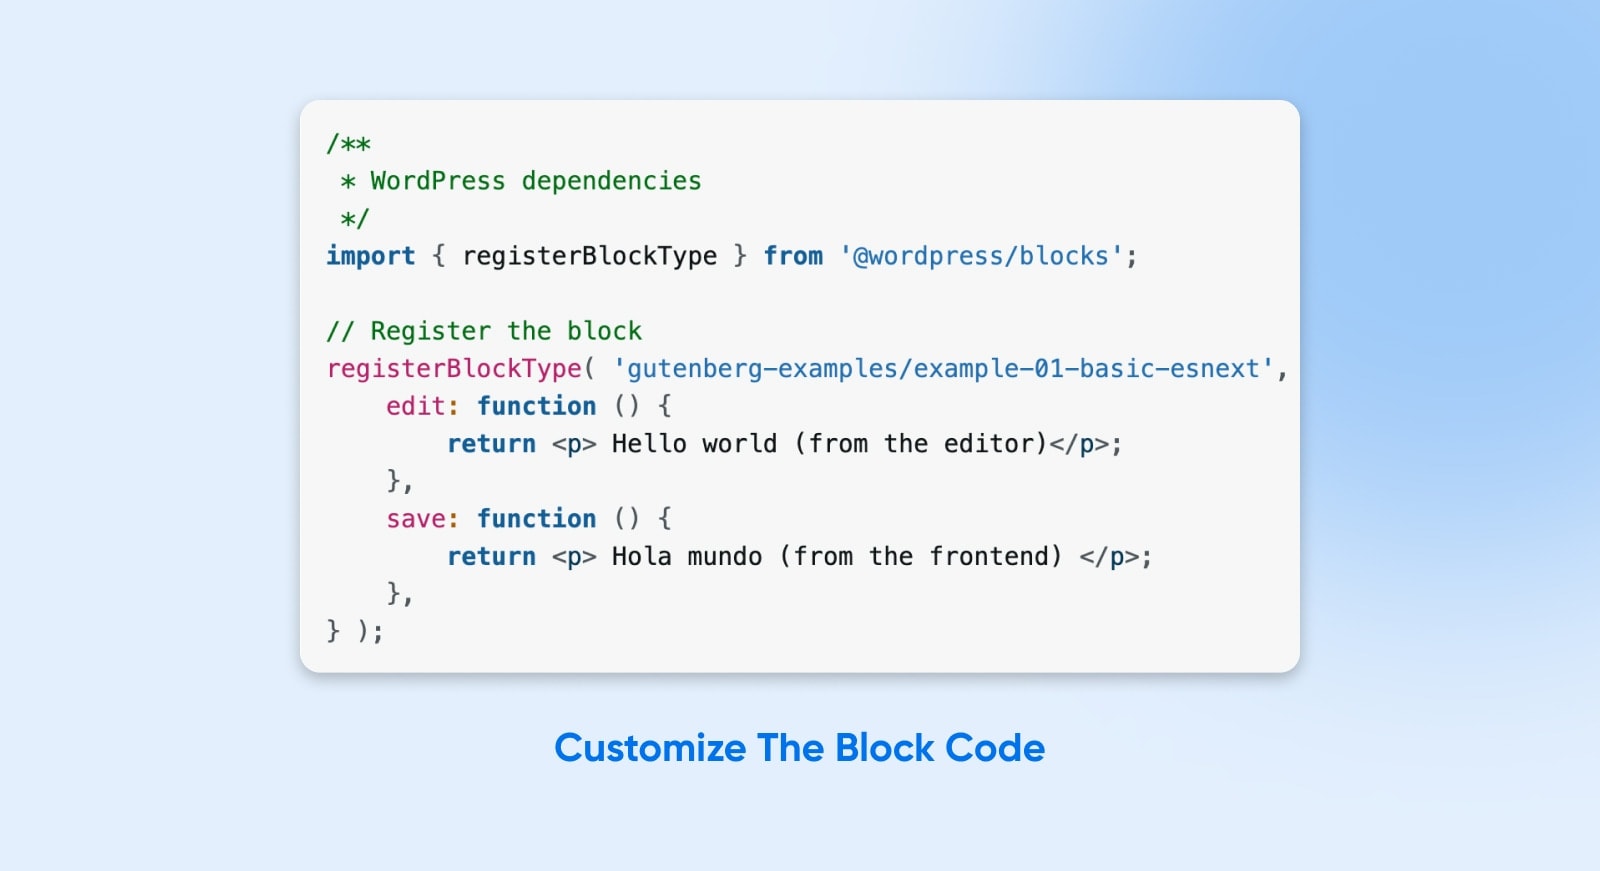
Notice that the registerBlockType function is ready to handle each the block editor inputs (“edit”) and the front-end display (“save”).
That is just scratching the surface of constructing a functional block.
You’ll likely wish to dig into the entire documentation for writing functional blocks using the WordPress Block API.
Once you have got the fundamentals down, you may pull in additional dependencies, tap into outside data sources, and absolutely anything else your heart desires.
Step #5: Add The Block From The Gutenberg Editor
With the activated plugin, you may add your block to any page or post from the Gutenberg editor.
Access it by utilizing the “+” button or “/” command, just like all other block.
The Sky’s The Limit
Alright, we went from basics to advanced with this one, but the excellent news is that now you’re unstoppable.
Between the default block options, the Genesis plugin, and the power to construct your very own from-scratch blocks — there’s nothing which you can’t do!
And since blocks are so incredibly powerful and versatile, there’s nearly nothing you may’t construct. Your WordPress site now has nearly infinite functionality, and you may make the positioning, app, or project of your dreams.